什么是pinia Pinia 是 Vue 的专属状态管理库,可以实现跨组件或页面共享状态,是 vuex 状态管理工具的替代品,和 Vuex相比,具备以下优势
提供更加简单的API (去掉了 mutation )
提供符合组合式API风格的API (和 Vue3 新语法统一)
去掉了modules的概念,每一个store都是一个独立的模块
搭配 TypeScript 一起使用提供可靠的类型推断
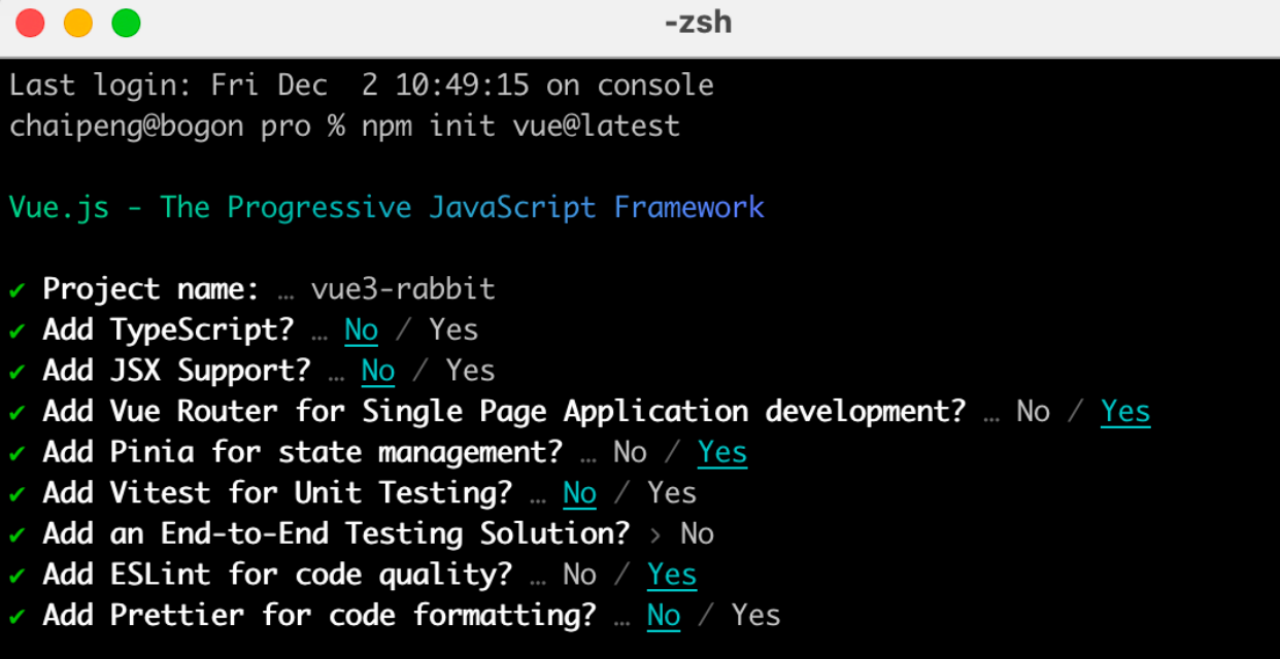
创建空Vue项目并安装Pinia 1. 创建空Vue项目 2. 安装Pinia并注册 1 2 3 4 5 6 7 import { createPinia } from 'pinia' const app = createApp (App )app.use (createPinia ()) app.use (router) app.mount ('#app' )
实现counter
核心步骤:
定义store
组件使用store
1- 定义store
1 2 3 4 5 6 7 8 9 10 11 12 13 14 15 16 17 18 19 import { defineStore } from 'pinia' import { ref } from 'vue' export const useCounterStore = defineStore ('counter' , ()=> { const count = ref (0 ) const increment = ( count.value ++ } return { count, increment } })
2- 组件使用store
1 2 3 4 5 6 7 8 9 10 11 12 <script setup> // 1. 导入use方法 import { useCounterStore } from '@/stores/counter' // 2. 执行方法得到store store里有数据和方法 const counterStore = useCounterStore() </script> <template> <button @click="counterStore.increment"> {{ counterStore.count }} </button> </template>
实现getters
getters直接使用计算属性即可实现
1 2 3 4 const count = ref (0 )const doubleCount = computed (() => count.value * 2 )
异步action
思想:action函数既支持同步也支持异步,和在组件中发送网络请求写法保持一致
store中定义action
组件中触发action
1- store中定义action
1 2 3 4 5 6 7 8 9 10 11 12 13 14 15 16 const API_URL = 'http://geek.itheima.net/v1_0/channels' export const useCounterStore = defineStore ('counter' , ()=> { const list = ref ([]) const loadList = async ( const res = await axios.get (API_URL ) list.value = res.data .data .channels } return { list, loadList } })
2- 组件中调用action
1 2 3 4 5 6 7 8 9 10 11 12 <script setup> import { useCounterStore } from '@/stores/counter' const counterStore = useCounterStore() // 调用异步action counterStore.loadList() </script> <template> <ul> <li v-for="item in counterStore.list" :key="item.id">{{ item.name }}</li> </ul> </template>
storeToRefs保持响应式解构
直接基于store进行解构赋值,响应式数据(state和getter)会丢失响应式特性,使用storeToRefs辅助保持响应式
1 2 3 4 5 6 7 8 9 10 11 12 13 14 15 16 <script setup> import { storeToRefs } from 'pinia' import { useCounterStore } from '@/stores/counter' const counterStore = useCounterStore() // 使用它storeToRefs包裹之后解构保持响应式 const { count } = storeToRefs(counterStore) const { increment } = counterStore </script> <template> <button @click="increment"> {{ count }} </button> </template>
创建项目并整理目录
jsconfig.json配置别名路径
配置别名路径可以在写代码时联想提示路径
1 2 3 4 5 6 7 8 { "compilerOptions" : { "baseUrl" : "./" , "paths" : { "@/*" : [ "src/*" ] } } }
elementPlus引入 1. 安装elementPlus和自动导入插件 1 2 npm i elementPlus npm install -D unplugin-vue-components unplugin-auto-import
2. 配置自动按需导入 1 2 3 4 5 6 7 8 9 10 11 12 13 14 15 16 17 import AutoImport from 'unplugin-auto-import/vite' import Components from 'unplugin-vue-components/vite' import { ElementPlusResolver } from 'unplugin-vue-components/resolvers' export default defineConfig ({ plugins : [ AutoImport ({ resolvers : [ElementPlusResolver ()], }), Components ({ resolvers : [ElementPlusResolver ()], }), ] })
3. 测试组件 1 2 3 <template> <el-button type="primary">i am button</el-button> </template>
定制elementPlus主题 1. 安装sass
基于vite的项目默认不支持css预处理器,需要开发者单独安装
2. 准备定制化的样式文件 1 2 3 4 5 6 7 8 9 10 11 12 13 14 15 16 17 18 19 20 21 22 23 24 25 @forward 'element-plus/theme-chalk/src/common/var.scss' with ( $colors : ( 'primary' : ( 'base' : #27ba9b, ), 'success' : ( 'base' : #1dc779, ), 'warning' : ( 'base' : #ffb302, ), 'danger' : ( 'base' : #e26237, ), 'error' : ( 'base' : #cf4444, ), ) )
3. 自动导入配置
这里自动导入需要深入到elementPlus的组件中,按照官方的配置文档来
自动导入定制化样式文件进行样式覆盖
按需定制主题配置 (需要安装 unplugin-element-plus)
1 2 3 4 5 6 7 8 9 10 11 12 13 14 15 16 17 18 19 20 21 22 23 24 25 26 27 28 29 30 31 32 33 34 35 36 37 38 39 import { fileURLToPath, URL } from 'node:url' import { defineConfig } from 'vite' import vue from '@vitejs/plugin-vue' import AutoImport from 'unplugin-auto-import/vite' import Components from 'unplugin-vue-components/vite' import { ElementPlusResolver } from 'unplugin-vue-components/resolvers' import ElementPlus from 'unplugin-element-plus/vite' export default defineConfig ({ plugins : [ vue (), AutoImport ({ resolvers : [ElementPlusResolver ()], }), Components ({ resolvers : [ElementPlusResolver ({importStyle :"sass" })], }), ], resolve : { alias : { '@' : fileURLToPath (new URL ('./src' , import .meta .url )) } }, css : { preprocessorOptions : { scss : { additionalData : ` @use "@/styles/element/index.scss" as *; ` , } } } })
axios安装并简单封装 1. 安装axios 2. 基础配置
官方文档地址:https://axios-http.com/zh/docs/intro
实例化 - baseURL + timeout
拦截器 - 携带token 401拦截等
1 2 3 4 5 6 7 8 9 10 11 12 13 14 15 16 17 18 19 20 import axios from 'axios' const http = axios.create ({ baseURL : 'http://pcapi-xiaotuxian-front-devtest.itheima.net' , timeout : 5000 }) instance.interceptors .request .use (config => return config }, e =>Promise .reject (e)) instance.interceptors .response .use (res =>data , e => return Promise .reject (e) }) export default http
3. 封装请求函数并测试 1 2 3 4 5 6 7 import http from '@/utils/http' export function getCategoryAPI ( return http ({ url : 'home/category/head' }) }
路由整体设计 路由设计原则:找页面的切换方式,如果是整体切换,则为一级路由,如果是在一级路由的内部进行的内容切换,则为二级路由
1 2 3 <template > 我是登录页 </template >
1 2 3 <template > 我是首页 </template >
1 2 3 <template > 我是home </template >
1 2 3 <template > 我是分类 </template >
1 2 3 4 5 6 7 8 9 10 11 12 13 14 15 16 17 18 19 20 21 22 23 24 25 26 27 28 29 30 31 32 33 34 35 36 import { createRouter, createWebHistory } from 'vue-router' import Login from '@/views/Login/index.vue' import Layout from '@/views/Layout/index.vue' import Home from '@/views/Home/index.vue' import Category from '@/views/Category/index.vue' const router = createRouter ({ history : createWebHistory (import .meta .env .BASE_URL ), routes : [ { path : '/' , component : Layout , children : [ { path : '' , component : Home }, { path : 'category' , component : Category } ] }, { path : '/login' , component : Login } ] }) export default router
静态资源引入和Error Lens安装 1. 静态资源引入
图片资源 - 把 images 文件夹放到 assets 目录下
样式资源 - 把 common.scss 文件放到 styles 目录下
2. Error Lens插件安装
scss变量自动导入 1 2 3 4 5 $xtxColor: #27ba9b ; $helpColor: #e26237 ; $sucColor: #1dc779 ; $warnColor: #ffb302 ; $priceColor: #cf4444 ;
1 2 3 4 5 6 7 8 9 10 11 css: { preprocessorOptions: { scss: { additionalData: ` @use "@/styles/element/index.scss" as *; @use "@/styles/var.scss" as *; `, } } }
组件结构快速搭建 1 2 3 4 5 6 7 8 9 10 11 12 13 14 15 16 17 18 19 20 21 22 23 24 25 26 27 28 29 30 31 32 33 34 35 36 37 38 39 40 41 42 43 44 45 46 47 48 49 50 51 52 53 54 55 56 57 58 59 60 61 62 63 64 65 <script setup> </script> <template> <nav class="app-topnav"> <div class="container"> <ul> <template v-if="true"> <li><a href="javascript:;"><i class="iconfont icon-user"></i>周杰伦</a></li> <li> <el-popconfirm title="确认退出吗?" confirm-button-text="确认" cancel-button-text="取消"> <template #reference> <a href="javascript:;">退出登录</a> </template> </el-popconfirm> </li> <li><a href="javascript:;">我的订单</a></li> <li><a href="javascript:;">会员中心</a></li> </template> <template v-else> <li><a href="javascript:;">请先登录</a></li> <li><a href="javascript:;">帮助中心</a></li> <li><a href="javascript:;">关于我们</a></li> </template> </ul> </div> </nav> </template> <style scoped lang="scss"> .app-topnav { background: #333; ul { display: flex; height: 53px; justify-content: flex-end; align-items: center; li { a { padding: 0 15px; color: #cdcdcd; line-height: 1; display: inline-block; i { font-size: 14px; margin-right: 2px; } &:hover { color: $xtxColor; } } ~li { a { border-left: 2px solid #666; } } } } } </style>
1 2 3 4 5 6 7 8 9 10 11 12 13 14 15 16 17 18 19 20 21 22 23 24 25 26 27 28 29 30 31 32 33 34 35 36 37 38 39 40 41 42 43 44 45 46 47 48 49 50 51 52 53 54 55 56 57 58 59 60 61 62 63 64 65 66 67 68 69 70 71 72 73 74 75 76 77 78 79 80 81 82 83 84 85 86 87 88 89 90 91 92 93 94 95 96 97 98 99 100 101 102 103 104 105 106 107 108 109 110 111 112 113 114 115 116 117 118 119 120 121 122 123 124 125 126 127 128 129 130 131 <script setup> </script> <template> <header class='app-header'> <div class="container"> <h1 class="logo"> <RouterLink to="/">小兔鲜</RouterLink> </h1> <ul class="app-header-nav"> <li class="home"> <RouterLink to="/">首页</RouterLink> </li> <li> <RouterLink to="/">居家</RouterLink> </li> <li> <RouterLink to="/">美食</RouterLink> </li> <li> <RouterLink to="/">服饰</RouterLink> </li> </ul> <div class="search"> <i class="iconfont icon-search"></i> <input type="text" placeholder="搜一搜"> </div> <!-- 头部购物车 --> </div> </header> </template> <style scoped lang='scss'> .app-header { background: #fff; .container { display: flex; align-items: center; } .logo { width: 200px; a { display: block; height: 132px; width: 100%; text-indent: -9999px; background: url('@/assets/images/logo.png') no-repeat center 18px / contain; } } .app-header-nav { width: 820px; display: flex; padding-left: 40px; position: relative; z-index: 998; li { margin-right: 40px; width: 38px; text-align: center; a { font-size: 16px; line-height: 32px; height: 32px; display: inline-block; &:hover { color: $xtxColor; border-bottom: 1px solid $xtxColor; } } .active { color: $xtxColor; border-bottom: 1px solid $xtxColor; } } } .search { width: 170px; height: 32px; position: relative; border-bottom: 1px solid #e7e7e7; line-height: 32px; .icon-search { font-size: 18px; margin-left: 5px; } input { width: 140px; padding-left: 5px; color: #666; } } .cart { width: 50px; .curr { height: 32px; line-height: 32px; text-align: center; position: relative; display: block; .icon-cart { font-size: 22px; } em { font-style: normal; position: absolute; right: 0; top: 0; padding: 1px 6px; line-height: 1; background: $helpColor; color: #fff; font-size: 12px; border-radius: 10px; font-family: Arial; } } } } </style>
1 2 3 4 5 6 7 8 9 10 11 12 13 14 15 16 17 18 19 20 21 22 23 24 25 26 27 28 29 30 31 32 33 34 35 36 37 38 39 40 41 42 43 44 45 46 47 48 49 50 51 52 53 54 55 56 57 58 59 60 61 62 63 64 65 66 67 68 69 70 71 72 73 74 75 76 77 78 79 80 81 82 83 84 85 86 87 88 89 90 91 92 93 94 95 96 97 98 99 100 101 102 103 104 105 106 107 108 109 110 111 112 113 114 115 116 117 118 119 120 121 122 123 124 125 126 127 128 129 130 131 132 133 134 135 136 137 138 139 140 141 142 143 144 145 146 147 148 149 150 151 152 153 154 155 156 157 158 159 160 161 162 163 164 165 166 167 168 169 170 171 172 173 174 175 176 177 178 179 180 181 182 183 184 185 186 187 188 189 190 191 192 193 194 195 196 197 198 199 200 201 202 203 204 205 206 207 208 209 210 211 212 213 214 215 216 217 218 219 220 221 222 223 224 225 226 227 228 <template> <footer class="app_footer"> <!-- 联系我们 --> <div class="contact"> <div class="container"> <dl> <dt>客户服务</dt> <dd><i class="iconfont icon-kefu"></i> 在线客服</dd> <dd><i class="iconfont icon-question"></i> 问题反馈</dd> </dl> <dl> <dt>关注我们</dt> <dd><i class="iconfont icon-weixin"></i> 公众号</dd> <dd><i class="iconfont icon-weibo"></i> 微博</dd> </dl> <dl> <dt>下载APP</dt> <dd class="qrcode"><img src="@/assets/images/qrcode.jpg" /></dd> <dd class="download"> <span>扫描二维码</span> <span>立马下载APP</span> <a href="javascript:;">下载页面</a> </dd> </dl> <dl> <dt>服务热线</dt> <dd class="hotline">400-0000-000 <small>周一至周日 8:00-18:00</small></dd> </dl> </div> </div> <!-- 其它 --> <div class="extra"> <div class="container"> <div class="slogan"> <a href="javascript:;"> <i class="iconfont icon-footer01"></i> <span>价格亲民</span> </a> <a href="javascript:;"> <i class="iconfont icon-footer02"></i> <span>物流快捷</span> </a> <a href="javascript:;"> <i class="iconfont icon-footer03"></i> <span>品质新鲜</span> </a> </div> <!-- 版权信息 --> <div class="copyright"> <p> <a href="javascript:;">关于我们</a> <a href="javascript:;">帮助中心</a> <a href="javascript:;">售后服务</a> <a href="javascript:;">配送与验收</a> <a href="javascript:;">商务合作</a> <a href="javascript:;">搜索推荐</a> <a href="javascript:;">友情链接</a> </p> <p>CopyRight © 小兔鲜儿</p> </div> </div> </div> </footer> </template> <style scoped lang='scss'> .app_footer { overflow: hidden; background-color: #f5f5f5; padding-top: 20px; .contact { background: #fff; .container { padding: 60px 0 40px 25px; display: flex; } dl { height: 190px; text-align: center; padding: 0 72px; border-right: 1px solid #f2f2f2; color: #999; &:first-child { padding-left: 0; } &:last-child { border-right: none; padding-right: 0; } } dt { line-height: 1; font-size: 18px; } dd { margin: 36px 12px 0 0; float: left; width: 92px; height: 92px; padding-top: 10px; border: 1px solid #ededed; .iconfont { font-size: 36px; display: block; color: #666; } &:hover { .iconfont { color: $xtxColor; } } &:last-child { margin-right: 0; } } .qrcode { width: 92px; height: 92px; padding: 7px; border: 1px solid #ededed; } .download { padding-top: 5px; font-size: 14px; width: auto; height: auto; border: none; span { display: block; } a { display: block; line-height: 1; padding: 10px 25px; margin-top: 5px; color: #fff; border-radius: 2px; background-color: $xtxColor; } } .hotline { padding-top: 20px; font-size: 22px; color: #666; width: auto; height: auto; border: none; small { display: block; font-size: 15px; color: #999; } } } .extra { background-color: #333; } .slogan { height: 178px; line-height: 58px; padding: 60px 100px; border-bottom: 1px solid #434343; display: flex; justify-content: space-between; a { height: 58px; line-height: 58px; color: #fff; font-size: 28px; i { font-size: 50px; vertical-align: middle; margin-right: 10px; font-weight: 100; } span { vertical-align: middle; text-shadow: 0 0 1px #333; } } } .copyright { height: 170px; padding-top: 40px; text-align: center; color: #999; font-size: 15px; p { line-height: 1; margin-bottom: 20px; } a { color: #999; line-height: 1; padding: 0 10px; border-right: 1px solid #999; &:last-child { border-right: none; } } } } </style>
1 2 3 4 5 6 7 8 9 10 11 12 <script setup> import LayoutNav from './components/LayoutNav.vue' import LayoutHeader from './components/LayoutHeader.vue' import LayoutFooter from './components/LayoutFooter.vue' </script> <template> <LayoutNav /> <LayoutHeader /> <RouterView /> <LayoutFooter /> </template>
字体图标渲染
字体图标采用的是阿里的字体图标库,样式文件已经准备好,在 index.html文件中引入即可
1 <link rel ="stylesheet" href ="//at.alicdn.com/t/font_2143783_iq6z4ey5vu.css" >
一级导航渲染 实现步骤
封装接口函数
调用接口函数
v-for渲染模版
代码落地
1 2 3 4 5 6 7 import httpInstance from '@/utils/http' export function getCategoryAPI ( return httpInstance ({ url : '/home/category/head' }) }
1 2 3 4 5 6 7 8 9 10 11 12 13 14 15 16 17 18 19 20 21 22 23 24 25 26 27 28 29 30 31 32 33 <script setup> import { getCategoryAPI } from '@/apis/layout' import { onMounted, ref } from 'vue' const categoryList = ref([]) const getCategory = async () => { const res = await getCategoryAPI() categoryList.value = res.result } onMounted(() => getCategory()) </script> <template> <header class='app-header'> <div class="container"> <h1 class="logo"> <RouterLink to="/">小兔鲜</RouterLink> </h1> <ul class="app-header-nav"> <li class="home" v-for="item in categoryList" :key="item.id"> <RouterLink to="/">{{ item.name }}</RouterLink> </li> </ul> <div class="search"> <i class="iconfont icon-search"></i> <input type="text" placeholder="搜一搜"> </div> <!-- 头部购物车 --> </div> </header> </template>
吸顶导航交互实现 1. 准备组件静态结构 1 2 3 4 5 6 7 8 9 10 11 12 13 14 15 16 17 18 19 20 21 22 23 24 25 26 27 28 29 30 31 32 33 34 35 36 37 38 39 40 41 42 43 44 45 46 47 48 49 50 51 52 53 54 55 56 57 58 59 60 61 62 63 64 65 66 67 68 69 70 71 72 73 74 75 76 77 78 79 80 81 82 83 84 85 86 87 88 89 90 91 92 93 94 95 96 97 98 99 100 101 102 103 104 105 106 107 108 109 110 111 112 113 114 115 116 117 118 119 120 121 122 123 124 125 126 127 128 129 130 131 132 133 134 135 136 <script setup> </script> <template> <div class="app-header-sticky"> <div class="container"> <RouterLink class="logo" to="/" /> <!-- 导航区域 --> <ul class="app-header-nav "> <li class="home"> <RouterLink to="/">首页</RouterLink> </li> <li> <RouterLink to="/">居家</RouterLink> </li> <li> <RouterLink to="/">美食</RouterLink> </li> <li> <RouterLink to="/">服饰</RouterLink> </li> <li> <RouterLink to="/">母婴</RouterLink> </li> <li> <RouterLink to="/">个护</RouterLink> </li> <li> <RouterLink to="/">严选</RouterLink> </li> <li> <RouterLink to="/">数码</RouterLink> </li> <li> <RouterLink to="/">运动</RouterLink> </li> <li> <RouterLink to="/">杂项</RouterLink> </li> </ul> <div class="right"> <RouterLink to="/">品牌</RouterLink> <RouterLink to="/">专题</RouterLink> </div> </div> </div> </template> <style scoped lang='scss'> .app-header-sticky { width: 100%; height: 80px; position: fixed; left: 0; top: 0; z-index: 999; background-color: #fff; border-bottom: 1px solid #e4e4e4; // 此处为关键样式!!! // 状态一:往上平移自身高度 + 完全透明 transform: translateY(-100%); opacity: 0; // 状态二:移除平移 + 完全不透明 &.show { transition: all 0.3s linear; transform: none; opacity: 1; } .container { display: flex; align-items: center; } .logo { width: 200px; height: 80px; background: url("@/assets/images/logo.png") no-repeat right 2px; background-size: 160px auto; } .right { width: 220px; display: flex; text-align: center; padding-left: 40px; border-left: 2px solid $xtxColor; a { width: 38px; margin-right: 40px; font-size: 16px; line-height: 1; &:hover { color: $xtxColor; } } } } .app-header-nav { width: 820px; display: flex; padding-left: 40px; position: relative; z-index: 998; li { margin-right: 40px; width: 38px; text-align: center; a { font-size: 16px; line-height: 32px; height: 32px; display: inline-block; &:hover { color: $xtxColor; border-bottom: 1px solid $xtxColor; } } .active { color: $xtxColor; border-bottom: 1px solid $xtxColor; } } } </style>
2. 渲染基础数据 3. 实现吸顶交互
核心逻辑:根据滚动距离判断当前show类名是否显示,大于78显示,小于78,不显示
1 2 3 4 5 6 7 8 9 10 11 12 <script setup> import LayoutHeaderUl from './LayoutHeaderUl.vue' // vueUse import { useScroll } from '@vueuse/core' const { y } = useScroll(window) </script> <template> <div class="app-header-sticky" :class="{ show: y > 78 }"> <!-- 省略部分代码 --> </div> </template>
Pinia优化重复请求 1 2 3 4 5 6 7 8 9 10 11 12 13 14 15 16 17 18 19 import { ref } from 'vue' import { defineStore } from 'pinia' import { getCategoryAPI } from '@/apis/layout' export const useCategoryStore = defineStore ('category' , () => { const categoryList = ref ([]) const getCategory = async ( const res = await getCategoryAPI () categoryList.value = res.result } return { categoryList, getCategory } })
静态结构搭建和分类实现 1. 整体结构创建
1- 按照结构新增五个组件,准备最简单的模版,分别在Home模块的入口组件中引入
HomeCategory
HomeBanner
HomeNew
HomeHot
HomeProduct
1 2 3 4 5 6 <script setup> </script> <template> <div> HomeCategory </div> </template>
2- Home模块入口组件中引入并渲染
1 2 3 4 5 6 7 8 9 10 11 12 13 14 15 16 17 <script setup> import HomeCategory from './components/HomeCategory.vue' import HomeBanner from './components/HomeBanner.vue' import HomeNew from './components/HomeNew.vue' import HomeHot from './components/HomeHot.vue' import homeProduct from './components/HomeProduct.vue' </script> <template> <div class="container"> <HomeCategory /> <HomeBanner /> </div> <HomeNew /> <HomeHot /> <homeProduct /> </template>
2. 分类实现 1- 准备详细模版
1 2 3 4 5 6 7 8 9 10 11 12 13 14 15 16 17 18 19 20 21 22 23 24 25 26 27 28 29 30 31 32 33 34 35 36 37 38 39 40 41 42 43 44 45 46 47 48 49 50 51 52 53 54 55 56 57 58 59 60 61 62 63 64 65 66 67 68 69 70 71 72 73 74 75 76 77 78 79 80 81 82 83 84 85 86 87 88 89 90 91 92 93 94 95 96 97 98 99 100 101 102 103 104 105 106 107 108 109 110 111 112 113 114 115 116 117 118 119 120 121 122 123 124 125 126 127 128 129 130 131 132 133 134 135 136 137 138 139 140 141 142 143 144 145 146 147 148 149 150 151 152 153 <script setup> </script> <template> <div class="home-category"> <ul class="menu"> <li v-for="item in 9" :key="item"> <RouterLink to="/">居家</RouterLink> <RouterLink v-for="i in 2" :key="i" to="/">南北干货</RouterLink> <!-- 弹层layer位置 --> <div class="layer"> <h4>分类推荐 <small>根据您的购买或浏览记录推荐</small></h4> <ul> <li v-for="i in 5" :key="i"> <RouterLink to="/"> <img alt="" /> <div class="info"> <p class="name ellipsis-2"> 男士外套 </p> <p class="desc ellipsis">男士外套,冬季必选</p> <p class="price"><i>¥</i>200.00</p> </div> </RouterLink> </li> </ul> </div> </li> </ul> </div> </template> <style scoped lang='scss'> .home-category { width: 250px; height: 500px; background: rgba(0, 0, 0, 0.8); position: relative; z-index: 99; .menu { li { padding-left: 40px; height: 55px; line-height: 55px; &:hover { background: $xtxColor; } a { margin-right: 4px; color: #fff; &:first-child { font-size: 16px; } } .layer { width: 990px; height: 500px; background: rgba(255, 255, 255, 0.8); position: absolute; left: 250px; top: 0; display: none; padding: 0 15px; h4 { font-size: 20px; font-weight: normal; line-height: 80px; small { font-size: 16px; color: #666; } } ul { display: flex; flex-wrap: wrap; li { width: 310px; height: 120px; margin-right: 15px; margin-bottom: 15px; border: 1px solid #eee; border-radius: 4px; background: #fff; &:nth-child(3n) { margin-right: 0; } a { display: flex; width: 100%; height: 100%; align-items: center; padding: 10px; &:hover { background: #e3f9f4; } img { width: 95px; height: 95px; } .info { padding-left: 10px; line-height: 24px; overflow: hidden; .name { font-size: 16px; color: #666; } .desc { color: #999; } .price { font-size: 22px; color: $priceColor; i { font-size: 16px; } } } } } } } // 关键样式 hover状态下的layer盒子变成block &:hover { .layer { display: block; } } } } } </style>
2- 完成代码
1 2 3 4 5 6 7 8 9 10 11 12 13 14 15 16 17 18 19 20 21 22 23 24 25 26 27 28 29 30 31 32 33 34 35 <script setup> import { useCategoryStore } from '@/stores/category' const categoryStore = useCategoryStore() </script> <template> <div class="home-category"> <ul class="menu"> <li v-for="item in categoryStore.categoryList" :key="item.id"> <RouterLink to="/">{{ item.name }}</RouterLink> <RouterLink v-for="i in item.children.slice(0, 2)" :key="i" to="/">{{ i.name }}</RouterLink> <!-- 弹层layer位置 --> <div class="layer"> <h4>分类推荐 <small>根据您的购买或浏览记录推荐</small></h4> <ul> <li v-for="i in item.goods" :key="i.id"> <RouterLink to="/"> <img :src="i.picture" alt="" /> <div class="info"> <p class="name ellipsis-2"> {{ i.name }} </p> <p class="desc ellipsis">{{ i.desc }}</p> <p class="price"><i>¥</i>{{ i.price }}</p> </div> </RouterLink> </li> </ul> </div> </li> </ul> </div> </template>
banner轮播图实现 1. 熟悉组件 1 2 3 4 5 6 7 8 9 10 11 12 13 14 15 16 17 18 19 20 21 22 23 24 25 26 27 28 29 30 31 32 33 <script setup> </script> <template> <div class="home-banner"> <el-carousel height="500px"> <el-carousel-item v-for="item in 4" :key="item"> <img src="http://yjy-xiaotuxian-dev.oss-cn-beijing.aliyuncs.com/picture/2021-04-15/6d202d8e-bb47-4f92-9523-f32ab65754f4.jpg" alt=""> </el-carousel-item> </el-carousel> </div> </template> <style scoped lang='scss'> .home-banner { width: 1240px; height: 500px; position: absolute; left: 0; top: 0; z-index: 98; img { width: 100%; height: 500px; } } </style>
2. 获取数据渲染组件 1- 封装接口
1 2 3 4 5 6 7 8 9 10 11 import httpInstance from '@/utils/http' function getBannerAPI ( return request ({ url :'home/banner' }) }
2- 获取数据渲染模版
1 2 3 4 5 6 7 8 9 10 11 12 13 14 15 16 17 18 19 20 21 22 23 24 25 26 27 28 <script setup> import { getBannerAPI } from '@/apis/home' import { onMounted, ref } from 'vue' const bannerList = ref([]) const getBanner = async () => { const res = await getBannerAPI() console.log(res) bannerList.value = res.result } onMounted(() => getBanner()) </script> <template> <div class="home-banner"> <el-carousel height="500px"> <el-carousel-item v-for="item in bannerList" :key="item.id"> <img :src="item.imgUrl" alt=""> </el-carousel-item> </el-carousel> </div> </template>
面板组件封装 1. 纯静态结构 1 2 3 4 5 6 7 8 9 10 11 12 13 14 15 16 17 18 19 20 21 22 23 24 25 26 27 28 29 30 31 32 33 34 35 36 37 38 39 40 41 42 43 44 45 46 <script setup> </script> <template> <div class="home-panel"> <div class="container"> <div class="head"> <!-- 主标题和副标题 --> <h3> 新鲜好物<small>新鲜出炉 品质靠谱</small> </h3> </div> <!-- 主体内容区域 --> <div> 主体内容 </div> </div> </div> </template> <style scoped lang='scss'> .home-panel { background-color: #fff; .head { padding: 40px 0; display: flex; align-items: flex-end; h3 { flex: 1; font-size: 32px; font-weight: normal; margin-left: 6px; height: 35px; line-height: 35px; small { font-size: 16px; color: #999; margin-left: 20px; } } } } </style>
2. 完整代码 1 2 3 4 5 6 7 8 9 10 11 12 13 14 15 16 17 18 19 20 21 22 23 24 25 26 27 28 29 30 31 32 33 34 35 36 37 38 39 40 41 42 43 44 45 46 47 48 49 50 51 52 53 54 55 56 57 58 <script setup> defineProps({ title: { type: String, default: '' }, subTitle: { type: String, default: '' } }) </script> <template> <div class="home-panel"> <div class="container"> <div class="head"> <!-- 主标题和副标题 --> <h3> {{ title }}<small>{{ subTitle }}</small> </h3> </div> <!-- 主体内容区域 --> <slot name="main" /> </div> </div> </template> <style scoped lang='scss'> .home-panel { background-color: #fff; .head { padding: 40px 0; display: flex; align-items: flex-end; h3 { flex: 1; font-size: 32px; font-weight: normal; margin-left: 6px; height: 35px; line-height: 35px; small { font-size: 16px; color: #999; margin-left: 20px; } } } } </style>
新鲜好物实现 1. 准备模版 1 2 3 4 5 6 7 8 9 10 11 12 13 14 15 16 17 18 19 20 21 22 23 24 25 26 27 28 29 30 31 32 33 34 35 36 37 38 39 40 41 42 43 44 45 46 47 48 49 50 51 52 53 54 55 56 57 58 <script setup> </script> <template> <div></div> <!-- 下面是插槽主体内容模版 <ul class="goods-list"> <li v-for="item in newList" :key="item.id"> <RouterLink to="/"> <img :src="item.picture" alt="" /> <p class="name">{{ item.name }}</p> <p class="price">¥{{ item.price }}</p> </RouterLink> </li> </ul> --> </template> <style scoped lang='scss'> .goods-list { display: flex; justify-content: space-between; height: 406px; li { width: 306px; height: 406px; background: #f0f9f4; transition: all .5s; &:hover { transform: translate3d(0, -3px, 0); box-shadow: 0 3px 8px rgb(0 0 0 / 20%); } img { width: 306px; height: 306px; } p { font-size: 22px; padding-top: 12px; text-align: center; text-overflow: ellipsis; overflow: hidden; white-space: nowrap; } .price { color: $priceColor; } } } </style>
2. 封装接口 1 2 3 4 5 6 7 8 9 10 export const findNewAPI = ( return httpInstance ({ url :'/home/new' }) }
3. 获取数据渲染模版 1 2 3 4 5 6 7 8 9 10 11 12 13 14 15 16 17 18 19 20 21 22 23 24 25 26 27 28 <script setup> import HomePanel from './HomePanel.vue' import { getNewAPI } from '@/apis/home' import { ref } from 'vue' const newList = ref([]) const getNewList = async () => { const res = await getNewAPI() newList.value = res.result } getNewList() </script> <template> <HomePanel title="新鲜好物" sub-title="新鲜出炉 品质靠谱"> <template #main> <ul class="goods-list"> <li v-for="item in newList" :key="item.id"> <RouterLink :to="`/detail/${item.id}`"> <img :src="item.picture" alt="" /> <p class="name">{{ item.name }}</p> <p class="price">¥{{ item.price }}</p> </RouterLink> </li> </ul> </template> </HomePanel> </template>
人气推荐实现 1. 封装接口 1 2 3 4 5 6 7 8 export const getHotAPI = ( return httpInstance ('home/hot' , 'get' , {}) }
2. 获取数据渲染模版 1 2 3 4 5 6 7 8 9 10 11 12 13 14 15 16 17 18 19 20 21 22 23 24 25 26 27 28 29 30 31 32 33 34 35 36 37 38 39 40 41 42 43 44 45 46 47 48 49 50 51 52 53 54 55 56 57 58 59 60 61 <script setup> import HomePanel from './HomePanel.vue' import { getHotAPI } from '@/apis/home' import { ref } from 'vue' const hotList = ref([]) const getHotList = async () => { const res = await getHotAPI() hotList.value = res.result } getHotList() </script> <template> <HomePanel title="人气推荐" sub-title="人气爆款 不容错过"> <ul class="goods-list"> <li v-for="item in hotList" :key="item.id"> <RouterLink to="/"> <img v-img-lazy="item.picture" alt=""> <p class="name">{{ item.title }}</p> <p class="desc">{{ item.alt }}</p> </RouterLink> </li> </ul> </HomePanel> </template> <style scoped lang='scss'> .goods-list { display: flex; justify-content: space-between; height: 426px; li { width: 306px; height: 406px; transition: all .5s; &:hover { transform: translate3d(0, -3px, 0); box-shadow: 0 3px 8px rgb(0 0 0 / 20%); } img { width: 306px; height: 306px; } p { font-size: 22px; padding-top: 12px; text-align: center; } .desc { color: #999; font-size: 18px; } } } </style>
懒加载指令实现 1. 封装全局指令 1 2 3 4 5 6 7 8 9 10 11 12 13 14 15 16 17 18 19 20 21 22 23 24 25 26 import { useIntersectionObserver } from '@vueuse/core' export const lazyPlugin = { install (app) { app.directive ('img-lazy' , { mounted (el, binding) { console .log (el, binding.value ) const { stop } = useIntersectionObserver ( el, ([{ isIntersecting }] ) => { console .log (isIntersecting) if (isIntersecting) { el.src = binding.value stop () } }, ) } }) } }
2. 注册全局指令 1 2 3 import { directivePlugin } from '@/directives' app.use (directivePlugin)
Product产品列表实现 1. 基础数据渲染 1- 准备静态模版
1 2 3 4 5 6 7 8 9 10 11 12 13 14 15 16 17 18 19 20 21 22 23 24 25 26 27 28 29 30 31 32 33 34 35 36 37 38 39 40 41 42 43 44 45 46 47 48 49 50 51 52 53 54 55 56 57 58 59 60 61 62 63 64 65 66 67 68 69 70 71 72 73 74 75 76 77 78 79 80 81 82 83 84 85 86 87 88 89 90 91 92 93 94 95 96 97 98 99 100 101 102 103 104 105 106 107 108 109 110 111 112 113 114 115 116 117 118 119 120 121 122 123 124 125 126 127 128 129 130 131 132 133 134 135 136 137 138 139 140 141 142 143 144 145 146 147 148 149 150 151 152 153 154 155 156 <script setup> import HomePanel from './HomePanel.vue' </script> <template> <div class="home-product"> <!-- <HomePanel :title="cate.name" v-for="cate in goodsProduct" :key="cate.id"> <div class="box"> <RouterLink class="cover" to="/"> <img :src="cate.picture" /> <strong class="label"> <span>{{ cate.name }}馆</span> <span>{{ cate.saleInfo }}</span> </strong> </RouterLink> <ul class="goods-list"> <li v-for="good in cate.goods" :key="good.id"> <RouterLink to="/" class="goods-item"> <img :src="good.picture" alt="" /> <p class="name ellipsis">{{ good.name }}</p> <p class="desc ellipsis">{{ good.desc }}</p> <p class="price">¥{{ good.price }}</p> </RouterLink> </li> </ul> </div> </HomePanel> --> </div> </template> <style scoped lang='scss'> .home-product { background: #fff; margin-top: 20px; .sub { margin-bottom: 2px; a { padding: 2px 12px; font-size: 16px; border-radius: 4px; &:hover { background: $xtxColor; color: #fff; } &:last-child { margin-right: 80px; } } } .box { display: flex; .cover { width: 240px; height: 610px; margin-right: 10px; position: relative; img { width: 100%; height: 100%; } .label { width: 188px; height: 66px; display: flex; font-size: 18px; color: #fff; line-height: 66px; font-weight: normal; position: absolute; left: 0; top: 50%; transform: translate3d(0, -50%, 0); span { text-align: center; &:first-child { width: 76px; background: rgba(0, 0, 0, 0.9); } &:last-child { flex: 1; background: rgba(0, 0, 0, 0.7); } } } } .goods-list { width: 990px; display: flex; flex-wrap: wrap; li { width: 240px; height: 300px; margin-right: 10px; margin-bottom: 10px; &:nth-last-child(-n + 4) { margin-bottom: 0; } &:nth-child(4n) { margin-right: 0; } } } .goods-item { display: block; width: 220px; padding: 20px 30px; text-align: center; transition: all .5s; &:hover { transform: translate3d(0, -3px, 0); box-shadow: 0 3px 8px rgb(0 0 0 / 20%); } img { width: 160px; height: 160px; } p { padding-top: 10px; } .name { font-size: 16px; } .desc { color: #999; height: 29px; } .price { color: $priceColor; font-size: 20px; } } } } </style>
2- 封装接口
1 2 3 4 5 6 7 8 9 10 export const getGoodsAPI = ( return httpInstance ({ url : '/home/goods' }) }
3- 获取并渲染数据
1 2 3 4 5 6 7 8 9 10 11 12 13 14 15 16 17 18 19 20 21 22 23 24 25 26 27 28 29 30 31 32 33 34 35 36 37 <script setup> import HomePanel from './HomePanel.vue' import { getGoodsAPI } from '@/apis/home' import { ref } from 'vue' const goodsProduct = ref([]) const getGoods = async () => { const { result } = await getGoodsAPI() goodsProduct.value = result } onMounted( ()=> getGoods() ) </script> <template> <div class="home-product"> <HomePanel :title="cate.name" v-for="cate in goodsProduct" :key="cate.id"> <div class="box"> <RouterLink class="cover" to="/"> <img :src="cate.picture" /> <strong class="label"> <span>{{ cate.name }}馆</span> <span>{{ cate.saleInfo }}</span> </strong> </RouterLink> <ul class="goods-list"> <li v-for="goods in cate.goods" :key="good.id"> <RouterLink to="/" class="goods-item"> <img :src="goods.picture" alt="" /> <p class="name ellipsis">{{ goods.name }}</p> <p class="desc ellipsis">{{ goods.desc }}</p> <p class="price">¥{{ goods.price }}</p> </RouterLink> </li> </ul> </div> </HomePanel> </div> </template>
2. 图片懒加载 1 2 3 4 5 6 7 8 9 10 11 12 13 14 15 16 17 18 <div class ="home-product" > <HomePanel :title ="cate.name" v-for ="cate in goodsProduct" :key ="cate.id" > <div class ="box" > <RouterLink class ="cover" to ="/" > <img v-img-lazy ="cate.picture" /> </RouterLink > <ul class ="goods-list" > <li v-for ="goods in cate.goods" :key ="goods.id" > <RouterLink to ="/" class ="goods-item" > <img v-img-lazy ="goods.picture" alt ="" /> </RouterLink > </li > </ul > </div > </HomePanel > </div >
GoodsItem组件封装 1. 封装组件 1 2 3 4 5 6 7 8 9 10 11 12 13 14 15 16 17 18 19 20 21 22 23 24 25 26 27 28 29 30 31 32 33 34 35 36 37 38 39 40 41 42 43 44 45 46 47 48 49 50 51 52 53 54 55 56 <script setup> defineProps({ goods: { type: Object, default: () => { } } }) </script> <template> <RouterLink to="/" class="goods-item"> <img :src="goods.picture" alt="" /> <p class="name ellipsis">{{ goods.name }}</p> <p class="desc ellipsis">{{ goods.desc }}</p> <p class="price">¥{{ goods.price }}</p> </RouterLink> </template> <style scoped lang="scss"> .goods-item { display: block; width: 220px; padding: 20px 30px; text-align: center; transition: all .5s; &:hover { transform: translate3d(0, -3px, 0); box-shadow: 0 3px 8px rgb(0 0 0 / 20%); } img { width: 160px; height: 160px; } p { padding-top: 10px; } .name { font-size: 16px; } .desc { color: #999; height: 29px; } .price { color: $priceColor; font-size: 20px; } } </style>
2. 使用组件 1 2 3 4 5 <ul class="goods-list"> <li v-for="goods in cate.goods" :key="item.id"> <GoodsItem :goods="goods" /> </li> </ul>
静态结构搭建和路由配置 1. 准备分类组件 1 2 3 4 5 6 7 8 9 <script setup> </script> <template> <div class='top-category'> 我是分类 </div> </template>
2. 配置路由 1 2 3 4 5 6 7 8 9 10 11 12 13 14 15 16 17 18 19 20 21 22 23 24 25 26 27 28 29 30 31 32 33 34 import { createRouter, createWebHashHistory } from 'vue-router' import Layout from '@/views/Layout/index.vue' import Home from '@/views/Home/index.vue' import Category from '@/views/Category/index.vue' const router = createRouter ({ history : createWebHashHistory (import .meta .env .BASE_URL ), routes : [ { path : '/' , name : 'layout' , component : Layout , children : [ { path : '' , name : 'home' , component : Home }, { path : 'category/:id' , name : 'category' , component : Category } ] }, { path : '/login' , name : 'login' , component : Login }, ] }) export default router
3. 配置导航区域链接 1 2 3 4 5 <li v-for ="item in categoryStore.categoryList" :key ="item.id" > <RouterLink active-class ="active" :to ="`/category/${item.id}`" > {{ item.name }} </RouterLink > </li >
面包屑导航渲染 1. 认识组件准备模版 1 2 3 4 5 6 7 8 9 10 11 12 13 14 15 16 17 18 19 20 21 22 23 24 25 26 27 28 29 30 31 32 33 34 35 36 37 38 39 40 41 42 43 44 45 46 47 48 49 50 51 52 53 54 55 56 57 58 59 60 61 62 63 64 65 66 67 68 69 70 71 72 73 74 75 76 77 78 79 80 81 82 83 84 85 86 87 88 89 90 91 92 93 94 95 96 97 98 <script setup> </script> <template> <div class="top-category"> <div class="container m-top-20"> <!-- 面包屑 --> <div class="bread-container"> <el-breadcrumb separator=">"> <el-breadcrumb-item :to="{ path: '/' }">首页</el-breadcrumb-item> <el-breadcrumb-item>居家</el-breadcrumb-item> </el-breadcrumb> </div> </div> </div> </template> <style scoped lang="scss"> .top-category { h3 { font-size: 28px; color: #666; font-weight: normal; text-align: center; line-height: 100px; } .sub-list { margin-top: 20px; background-color: #fff; ul { display: flex; padding: 0 32px; flex-wrap: wrap; li { width: 168px; height: 160px; a { text-align: center; display: block; font-size: 16px; img { width: 100px; height: 100px; } p { line-height: 40px; } &:hover { color: $xtxColor; } } } } } .ref-goods { background-color: #fff; margin-top: 20px; position: relative; .head { .xtx-more { position: absolute; top: 20px; right: 20px; } .tag { text-align: center; color: #999; font-size: 20px; position: relative; top: -20px; } } .body { display: flex; justify-content: space-around; padding: 0 40px 30px; } } .bread-container { padding: 25px 0; } } </style>
2. 封装接口 1 2 3 4 5 6 7 8 9 10 11 12 13 14 15 import request from '@/utils/request' export const getTopCategoryAPI = (id ) => { return request ({ url :'/category' , params :{ id } }) }
3. 渲染面包屑导航 1 2 3 4 5 6 7 8 9 10 11 12 13 14 15 16 17 18 19 20 21 <script setup> import { findTopCategoryAPI } from '@/apis/category' const categoryData = ref({}) const route = useRoute() const getCategory = async (id) => { // 如何在setup中获取路由参数 useRoute() -> route 等价于this.$route const res = await findTopCategoryAPI(id) categoryData.value = res.result } getCategory(route.params.id) </script> <template> <div class="bread-container"> <el-breadcrumb separator=">"> <el-breadcrumb-item :to="{ path: '/' }">首页</el-breadcrumb-item> <el-breadcrumb-item>{{ categoryData.name }}</el-breadcrumb-item> </el-breadcrumb> </div> </template>
分类Banner渲染 1. 适配接口 1 2 3 4 5 6 7 8 9 10 export function getBannerAPI (params = {} ) { const { distributionSite = '1' } = params return httpInstance ({ url : '/home/banner' , params : { distributionSite } }) }
2. 迁移首页Banner逻辑 1 2 3 4 5 6 7 8 9 10 11 12 13 14 15 16 17 18 19 20 21 22 23 24 25 26 27 28 29 30 31 32 33 34 35 36 37 38 39 40 41 42 43 44 45 46 47 48 49 50 51 52 53 54 <script setup> // 部分代码省略 import { getBannerAPI } from '@/apis/home' // 获取banner const bannerList = ref([]) const getBanner = async () => { const res = await getBannerAPI({ distributionSite: '2' }) console.log(res) bannerList.value = res.result } onMounted(() => getBanner()) </script> <template> <div class="top-category"> <div class="container m-top-20"> <!-- 面包屑 --> <div class="bread-container"> <el-breadcrumb separator=">"> <el-breadcrumb-item :to="{ path: '/' }">首页</el-breadcrumb-item> <el-breadcrumb-item>{{ categoryData.name }}</el-breadcrumb-item> </el-breadcrumb> </div> <!-- 轮播图 --> <div class="home-banner"> <el-carousel height="500px"> <el-carousel-item v-for="item in bannerList" :key="item.id"> <img :src="item.imgUrl" alt=""> </el-carousel-item> </el-carousel> </div> </div> </div> </template> <style scoped lang="scss"> // 部分代码省略 .home-banner { width: 1240px; height: 500px; margin: 0 auto; img { width: 100%; height: 500px; } } </style>
导航激活设置分类列表渲染 1. 导航激活状态设置 1 <RouterLink active-class="active" :to="`/category/${item.id}`">{{ item.name }}</RouterLink>
2. 分类数据模版 1 2 3 4 5 6 7 8 9 10 11 12 13 14 15 16 17 18 19 <div class ="sub-list" > <h3 > 全部分类</h3 > <ul > <li v-for ="i in categoryData.children" :key ="i.id" > <RouterLink to ="/" > <img :src ="i.picture" /> <p > {{ i.name }}</p > </RouterLink > </li > </ul > </div > <div class ="ref-goods" v-for ="item in categoryData.children" :key ="item.id" > <div class ="head" > <h3 > - {{ item.name }}-</h3 > </div > <div class ="body" > <GoodsItem v-for ="good in item.goods" :goods ="good" :key ="good.id" /> </div > </div >
★路由缓存问题解决(重要)
缓存问题:当路由path一样,参数不同的时候会选择直接复用路由对应的组件
☆例如从/users/johnny导航到/users/jolyne时,相同的组件实例将被复用。同时生命周期钩子不会被调用,也就是不会重新渲染了。
比如之前写的一级路由的切换
解决方案:
给 routerv-view 添加key属性,破坏缓存(让组件实例不复用,强制销毁重建),太过粗暴,存在浪费
使用 onBeforeRouteUpdate钩子函数,做精确更新(监听路由变化,变化之后执行数据更新操作)
基于业务逻辑的函数拆分
基本思想:把组件内独立的业务逻辑通过 useXXX 函数做封装处理,在组件中做组合使用
1 2 3 4 5 6 7 8 9 10 11 12 13 14 15 16 17 18 19 20 21 22 23 24 25 import { onMounted, ref } from 'vue' import { getCategoryAPI } from '@/apis/category' import { useRoute } from 'vue-router' import { onBeforeRouteUpdate } from 'vue-router' export function useCategory ( const categoryData = ref ({}) const route = useRoute () const getCategory = async (id = route.params.id ) => { const res = await getCategoryAPI (id) categoryData.value = res.result } onMounted (() => getCategory ()) onBeforeRouteUpdate ((to ) => { getCategory (to.params .id ) }) return { categoryData } }
1 2 3 4 5 6 7 8 9 10 11 12 13 14 15 16 17 18 19 20 21 import { ref, onMounted } from 'vue' import { getBannerAPI } from '@/apis/home' export function useBanner ( const bannerList = ref ([]) const getBanner = async ( const res = await getBannerAPI ({ distributionSite : '2' }) console .log (res) bannerList.value = res.result } onMounted (() => getBanner ()) return { bannerList } }
1 2 3 4 5 6 7 8 9 <script setup> import GoodsItem from '../Home/components/GoodsItem.vue' import { useBanner } from './composables/useBanner' import { useCategory } from './composables/useCategory' const { bannerList } = useBanner() const { categoryData } = useCategory() </script>
整体业务认识和路由配置 1. 准备组件模版 1 2 3 4 5 6 7 8 9 10 11 12 13 14 15 16 17 18 19 20 21 22 23 24 25 26 27 28 29 30 31 32 33 34 35 36 37 38 39 40 41 42 43 44 45 46 47 48 49 50 51 52 53 54 55 56 57 58 59 60 61 62 63 64 65 66 67 68 69 70 71 72 73 74 75 76 77 78 79 80 81 82 83 84 85 86 87 88 <script setup> </script> <template> <div class="container "> <!-- 面包屑 --> <div class="bread-container"> <el-breadcrumb separator=">"> <el-breadcrumb-item :to="{ path: '/' }">首页</el-breadcrumb-item> <el-breadcrumb-item :to="{ path: '/' }">居家 </el-breadcrumb-item> <el-breadcrumb-item>居家生活用品</el-breadcrumb-item> </el-breadcrumb> </div> <div class="sub-container"> <el-tabs> <el-tab-pane label="最新商品" name="publishTime"></el-tab-pane> <el-tab-pane label="最高人气" name="orderNum"></el-tab-pane> <el-tab-pane label="评论最多" name="evaluateNum"></el-tab-pane> </el-tabs> <div class="body"> <!-- 商品列表--> </div> </div> </div> </template> <style lang="scss" scoped> .bread-container { padding: 25px 0; color: #666; } .sub-container { padding: 20px 10px; background-color: #fff; .body { display: flex; flex-wrap: wrap; padding: 0 10px; } .goods-item { display: block; width: 220px; margin-right: 20px; padding: 20px 30px; text-align: center; img { width: 160px; height: 160px; } p { padding-top: 10px; } .name { font-size: 16px; } .desc { color: #999; height: 29px; } .price { color: $priceColor; font-size: 20px; } } .pagination-container { margin-top: 20px; display: flex; justify-content: center; } } </style>
2. 配置路由关系 1 2 3 4 5 6 7 8 9 10 11 12 13 14 15 16 17 18 19 20 21 22 23 24 25 26 27 28 29 30 31 32 33 34 35 36 37 38 39 40 import { createRouter, createWebHashHistory } from 'vue-router' import Layout from '@/views/Layout/index.vue' import Home from '@/views/Home/index.vue' import Category from '@/views/Category/index.vue' import SubCategory from '@/views/SubCategory/index.vue' const router = createRouter ({ history : createWebHashHistory (import .meta .env .BASE_URL ), routes : [ { path : '/' , name : 'layout' , component : Layout , children : [ { path : '' , name : 'home' , component : Home }, { path : 'category/:id' , name : 'category' , component : Category }, { path : 'category/sub/:id' , name : 'subCategory' , component : SubCategory }, ] }, { path : '/login' , name : 'login' , component : Login }, ] }) export default router
3. 跳转配置 1 2 3 4 5 6 7 8 9 10 11 <div class ="sub-list" > <h3 > 全部分类</h3 > <ul > <li v-for ="i in categoryData.children" :key ="i.id" > <RouterLink :to ="`/category/sub/${i.id}`" > <img :src ="i.picture" /> <p > {{ i.name }}</p > </RouterLink > </li > </ul > </div >
面包屑导航实现 1. 准备接口 1 2 3 4 5 6 7 8 9 10 11 12 13 14 15 export const getCategoryFilterAPI = (id ) => { return request ({ url :'/category/sub/filter' , params :{ id } }) }
2. 获取数据渲染模版 1 2 3 4 5 6 7 8 9 10 11 12 13 14 15 16 17 18 19 20 21 <script setup> import { getCategoryFilterAPI } from '@/apis/category' // 获取面包屑导航数据 const filterData = ref({}) const getFilterData = async () => { const res = await getCategoryFilterAPI(route.params.id) filterData.value = res.result } getFilterData() </script> <template> <div class="bread-container"> <el-breadcrumb separator=">"> <el-breadcrumb-item :to="{ path: '/' }">首页</el-breadcrumb-item> <el-breadcrumb-item :to="{ path: `/category/${filterData.parentId}` }">{{ filterData.parentName }} </el-breadcrumb-item> <el-breadcrumb-item>{{ filterData.name }}</el-breadcrumb-item> </el-breadcrumb> </div> </template>
分类基础列表实现 1. 准备接口 1 2 3 4 5 6 7 8 9 10 11 12 13 14 15 16 17 } export const getSubCategoryAPI = (data ) => { return request ({ url :'/category/goods/temporary' , method :'POST' , data }) }
2. 获取数据列表 1 2 3 4 5 6 7 8 9 10 11 12 13 14 15 16 17 18 19 20 <script setup> // 获取基础列表数据渲染 const goodList = ref([]) const reqData = ref({ categoryId: route.params.id, page: 1, pageSize: 20, sortField: 'publishTime' }) const getGoodList = async () => { const res = await getSubCategoryAPI(reqData.value) console.log(res) goodList.value = res.result.items } onMounted(() => getGoodList()) </script>
列表筛选实现
思路:tab组件切换时修改reqData中的sortField字段,重新拉取接口列表
1 2 3 4 5 6 7 8 9 10 11 12 13 14 15 16 <script setup> // tab切换回调 const tabChange = () => { console.log('tab切换了', reqData.value.sortField) reqData.value.page = 1 getGoodList() } </script> <template> <el-tabs v-model="reqData.sortField" @tab-change="tabChange"> <el-tab-pane label="最新商品" name="publishTime"></el-tab-pane> <el-tab-pane label="最高人气" name="orderNum"></el-tab-pane> <el-tab-pane label="评论最多" name="evaluateNum"></el-tab-pane> </el-tabs> </template>
无限加载实现
基础思路
触底条件满足之后 page++,拉取下一页数据
新老数据做数组拼接
判断是否已经全部加载完毕,停止监听
1 2 3 4 5 6 7 8 9 10 11 12 13 const disabled = ref (false )const load = async ( console .log ('加载更多数据咯' ) reqData.value .page ++ const res = await getSubCategoryAPI (reqData.value ) goodList.value = [...goodList.value , ...res.result .items ] if (res.result .items .length === 0 ) { disabled.value = true } }
整体认识和路由配置 1. 准备组件模版 1 2 3 4 5 6 7 8 9 10 11 12 13 14 15 16 17 18 19 20 21 22 23 24 25 26 27 28 29 30 31 32 33 34 35 36 37 38 39 40 41 42 43 44 45 46 47 48 49 50 51 52 53 54 55 56 57 58 59 60 61 62 63 64 65 66 67 68 69 70 71 72 73 74 75 76 77 78 79 80 81 82 83 84 85 86 87 88 89 90 91 92 93 94 95 96 97 98 99 100 101 102 103 104 105 106 107 108 109 110 111 112 113 114 115 116 117 118 119 120 121 122 123 124 125 126 127 128 129 130 131 132 133 134 135 136 137 138 139 140 141 142 143 144 145 146 147 148 149 150 151 152 153 154 155 156 157 158 159 160 161 162 163 164 165 166 167 168 169 170 171 172 173 174 175 176 177 178 179 180 181 182 183 184 185 186 187 188 189 190 191 192 193 194 195 196 197 198 199 200 201 202 203 204 205 206 207 208 209 210 211 212 213 214 215 216 217 218 219 220 221 222 223 224 225 226 227 228 229 230 231 232 233 234 235 236 237 238 239 240 241 242 243 244 245 246 247 248 249 250 251 252 253 254 255 256 257 258 259 260 261 262 263 264 265 266 267 268 269 270 271 272 273 274 275 276 277 278 279 280 281 282 283 284 285 286 287 288 289 290 291 292 293 294 295 296 297 298 299 300 301 302 303 304 305 306 307 308 309 310 311 312 313 314 315 316 317 318 319 320 321 322 323 324 325 326 327 328 329 330 331 332 333 334 335 336 337 338 339 340 341 342 343 344 345 346 347 348 349 350 351 352 353 354 355 356 <script setup> </script> <template> <div class="xtx-goods-page"> <div class="container"> <div class="bread-container"> <el-breadcrumb separator=">"> <el-breadcrumb-item :to="{ path: '/' }">首页</el-breadcrumb-item> <el-breadcrumb-item :to="{ path: '/' }">母婴 </el-breadcrumb-item> <el-breadcrumb-item :to="{ path: '/' }">跑步鞋 </el-breadcrumb-item> <el-breadcrumb-item>抓绒保暖,毛毛虫子儿童运动鞋</el-breadcrumb-item> </el-breadcrumb> </div> <!-- 商品信息 --> <div class="info-container"> <div> <div class="goods-info"> <div class="media"> <!-- 图片预览区 --> <!-- 统计数量 --> <ul class="goods-sales"> <li> <p>销量人气</p> <p> 100+ </p> <p><i class="iconfont icon-task-filling"></i>销量人气</p> </li> <li> <p>商品评价</p> <p>200+</p> <p><i class="iconfont icon-comment-filling"></i>查看评价</p> </li> <li> <p>收藏人气</p> <p>300+</p> <p><i class="iconfont icon-favorite-filling"></i>收藏商品</p> </li> <li> <p>品牌信息</p> <p>400+</p> <p><i class="iconfont icon-dynamic-filling"></i>品牌主页</p> </li> </ul> </div> <div class="spec"> <!-- 商品信息区 --> <p class="g-name"> 抓绒保暖,毛毛虫儿童鞋 </p> <p class="g-desc">好穿 </p> <p class="g-price"> <span>200</span> <span> 100</span> </p> <div class="g-service"> <dl> <dt>促销</dt> <dd>12月好物放送,App领券购买直降120元</dd> </dl> <dl> <dt>服务</dt> <dd> <span>无忧退货</span> <span>快速退款</span> <span>免费包邮</span> <a href="javascript:;">了解详情</a> </dd> </dl> </div> <!-- sku组件 --> <!-- 数据组件 --> <!-- 按钮组件 --> <div> <el-button size="large" class="btn"> 加入购物车 </el-button> </div> </div> </div> <div class="goods-footer"> <div class="goods-article"> <!-- 商品详情 --> <div class="goods-tabs"> <nav> <a>商品详情</a> </nav> <div class="goods-detail"> <!-- 属性 --> <ul class="attrs"> <li v-for="item in 3" :key="item.value"> <span class="dt">白色</span> <span class="dd">纯棉</span> </li> </ul> <!-- 图片 --> </div> </div> </div> <!-- 24热榜+专题推荐 --> <div class="goods-aside"> </div> </div> </div> </div> </div> </div> </template> <style scoped lang='scss'> .xtx-goods-page { .goods-info { min-height: 600px; background: #fff; display: flex; .media { width: 580px; height: 600px; padding: 30px 50px; } .spec { flex: 1; padding: 30px 30px 30px 0; } } .goods-footer { display: flex; margin-top: 20px; .goods-article { width: 940px; margin-right: 20px; } .goods-aside { width: 280px; min-height: 1000px; } } .goods-tabs { min-height: 600px; background: #fff; } .goods-warn { min-height: 600px; background: #fff; margin-top: 20px; } .number-box { display: flex; align-items: center; .label { width: 60px; color: #999; padding-left: 10px; } } .g-name { font-size: 22px; } .g-desc { color: #999; margin-top: 10px; } .g-price { margin-top: 10px; span { &::before { content: "¥"; font-size: 14px; } &:first-child { color: $priceColor; margin-right: 10px; font-size: 22px; } &:last-child { color: #999; text-decoration: line-through; font-size: 16px; } } } .g-service { background: #f5f5f5; width: 500px; padding: 20px 10px 0 10px; margin-top: 10px; dl { padding-bottom: 20px; display: flex; align-items: center; dt { width: 50px; color: #999; } dd { color: #666; &:last-child { span { margin-right: 10px; &::before { content: "•"; color: $xtxColor; margin-right: 2px; } } a { color: $xtxColor; } } } } } .goods-sales { display: flex; width: 400px; align-items: center; text-align: center; height: 140px; li { flex: 1; position: relative; ~li::after { position: absolute; top: 10px; left: 0; height: 60px; border-left: 1px solid #e4e4e4; content: ""; } p { &:first-child { color: #999; } &:nth-child(2) { color: $priceColor; margin-top: 10px; } &:last-child { color: #666; margin-top: 10px; i { color: $xtxColor; font-size: 14px; margin-right: 2px; } &:hover { color: $xtxColor; cursor: pointer; } } } } } } .goods-tabs { min-height: 600px; background: #fff; nav { height: 70px; line-height: 70px; display: flex; border-bottom: 1px solid #f5f5f5; a { padding: 0 40px; font-size: 18px; position: relative; >span { color: $priceColor; font-size: 16px; margin-left: 10px; } } } } .goods-detail { padding: 40px; .attrs { display: flex; flex-wrap: wrap; margin-bottom: 30px; li { display: flex; margin-bottom: 10px; width: 50%; .dt { width: 100px; color: #999; } .dd { flex: 1; color: #666; } } } >img { width: 100%; } } .btn { margin-top: 20px; } .bread-container { padding: 25px 0; } </style>
2. 配置路由 1 2 3 4 5 6 7 8 9 10 11 12 13 14 15 16 17 18 19 20 21 22 23 24 25 26 27 28 29 30 31 32 33 34 35 36 37 38 const router = createRouter ({ history : createWebHistory (import .meta .env .BASE_URL ), routes : [ { path : '/' , component : Layout , children : [ { path : '' , component : Home }, { path : 'category/:id' , component : Category }, { path : 'category/sub/:id' , component : SubCategory }, { path : 'detail/:id' , component : Detail } ] }, { path : '/login' , component : Login } ], scrollBehavior () { return { top : 0 } } })
3. 绑定模版测试跳转 1 2 3 4 5 <RouterLink :to ="`/detail/${item.id}`" > <img :src ="item.picture" alt ="" /> <p class ="name" > {{ item.name }}</p > <p class ="price" > ¥ {{ item.price }}</p > </RouterLink >
渲染基础数据 1. 封装接口 1 2 3 4 5 6 7 8 9 10 11 import request from '@/utils/http' export const getDetail = (id ) => { return request ({ url : '/goods' , params : { id } }) }
2. 获取数据渲染模版 1 2 3 4 5 6 7 8 9 10 11 12 13 14 15 16 17 18 19 20 21 22 23 24 25 26 27 28 29 30 31 32 33 34 35 36 37 38 39 40 41 42 43 44 45 46 47 48 49 50 51 52 53 54 55 56 57 58 59 60 61 62 63 64 65 66 67 68 69 70 71 72 73 74 75 76 77 78 79 80 81 82 83 84 85 86 87 88 89 90 91 92 93 94 95 96 97 98 99 100 101 102 103 104 105 106 107 108 109 110 111 112 113 114 115 116 117 118 119 120 121 122 123 124 125 126 127 128 129 130 <script setup> import { getDetail } from '@/apis/detail' import { onMounted, ref } from 'vue' import { useRoute } from 'vue-router' const goods = ref({}) const route = useRoute() const getGoods = async () => { const res = await getDetail(route.params.id) goods.value = res.result } onMounted(() => getGoods()) </script> <template> <div class="xtx-goods-page"> <div class="container" v-if="goods.details"> <div class="bread-container"> <el-breadcrumb separator=">"> <el-breadcrumb-item :to="{ path: '/' }">首页</el-breadcrumb-item> <!-- 错误原因:goods一开始{} {}.categories -> undefined -> undefined[1] 1. 可选链的语法?. 2. v-if手动控制渲染时机 保证只有数据存在才渲染 --> <el-breadcrumb-item :to="{ path: `/category/${goods.categories[1].id}` }">{{ goods.categories[1].name }} </el-breadcrumb-item> <el-breadcrumb-item :to="{ path: `/category/sub/${goods.categories[0].id}` }">{{ goods.categories[0].name }} </el-breadcrumb-item> <el-breadcrumb-item>抓绒保暖,毛毛虫子儿童运动鞋</el-breadcrumb-item> </el-breadcrumb> </div> <!-- 商品信息 --> <div class="info-container"> <div> <div class="goods-info"> <div class="media"> <!-- 图片预览区 --> <!-- 统计数量 --> <ul class="goods-sales"> <li> <p>销量人气</p> <p> {{ goods.salesCount }}+ </p> <p><i class="iconfont icon-task-filling"></i>销量人气</p> </li> <li> <p>商品评价</p> <p>{{ goods.commentCount }}+</p> <p><i class="iconfont icon-comment-filling"></i>查看评价</p> </li> <li> <p>收藏人气</p> <p>{{ goods.collectCount }}+</p> <p><i class="iconfont icon-favorite-filling"></i>收藏商品</p> </li> <li> <p>品牌信息</p> <p>{{ goods.brand.name }}</p> <p><i class="iconfont icon-dynamic-filling"></i>品牌主页</p> </li> </ul> </div> <div class="spec"> <!-- 商品信息区 --> <p class="g-name"> {{ goods.name }} </p> <p class="g-desc">{{ goods.desc }} </p> <p class="g-price"> <span>{{ goods.oldPrice }}</span> <span> {{ goods.price }}</span> </p> <div class="g-service"> <dl> <dt>促销</dt> <dd>12月好物放送,App领券购买直降120元</dd> </dl> <dl> <dt>服务</dt> <dd> <span>无忧退货</span> <span>快速退款</span> <span>免费包邮</span> <a href="javascript:;">了解详情</a> </dd> </dl> </div> <!-- sku组件 --> <!-- 数据组件 --> <!-- 按钮组件 --> <div> <el-button size="large" class="btn"> 加入购物车 </el-button> </div> </div> </div> <div class="goods-footer"> <div class="goods-article"> <!-- 商品详情 --> <div class="goods-tabs"> <nav> <a>商品详情</a> </nav> <div class="goods-detail"> <!-- 属性 --> <ul class="attrs"> <li v-for="item in goods.details.properties" :key="item.value"> <span class="dt">{{ item.name }}</span> <span class="dd">{{ item.value }}</span> </li> </ul> <!-- 图片 --> <img v-for="img in goods.details.pictures" :src="img" :key="img" alt=""> </div> </div> </div> <!-- 24热榜+专题推荐 --> <div class="goods-aside"> </div> </div> </div> </div> </div> </div> </template>
热榜区域 1. 渲染基础热榜数据 1- 准备模版
1 2 3 4 5 6 7 8 9 10 11 12 13 14 15 16 17 18 19 20 21 22 23 24 25 26 27 28 29 30 31 32 33 34 35 36 37 38 39 40 41 42 43 44 45 46 47 48 49 50 51 52 53 54 55 56 57 58 59 60 61 62 63 <script setup> </script> <template> <div class="goods-hot"> <h3>周日榜单</h3> <!-- 商品区块 --> <RouterLink to="/" class="goods-item" v-for="item in 3" :key="item.id"> <img :src="item.picture" alt="" /> <p class="name ellipsis">一双男鞋</p> <p class="desc ellipsis">一双好穿的男鞋</p> <p class="price">¥200.00</p> </RouterLink> </div> </template> <style scoped lang="scss"> .goods-hot { h3 { height: 70px; background: $helpColor; color: #fff; font-size: 18px; line-height: 70px; padding-left: 25px; margin-bottom: 10px; font-weight: normal; } .goods-item { display: block; padding: 20px 30px; text-align: center; background: #fff; img { width: 160px; height: 160px; } p { padding-top: 10px; } .name { font-size: 16px; } .desc { color: #999; height: 29px; } .price { color: $priceColor; font-size: 20px; } } } </style>
2- 封装接口
1 2 3 4 5 6 7 8 9 10 11 12 13 14 15 16 export const fetchHotGoodsAPI = ({ id, type, limit = 3 } ) => { return request ({ url :'/goods/hot' , params :{ id, type, limit } }) }
3- 获取基础数据渲染模版
1 2 3 4 5 6 7 8 9 10 11 12 13 14 15 16 17 18 19 20 21 22 23 24 25 26 27 28 29 30 31 32 33 <script setup> import { ref } from 'vue' import { getHotGoodsAPI } from '@/apis/detail' import { useRoute } from 'vue-router' const goodList = ref([]) const route = useRoute() const getHotList = async () => { const res = await getHotGoodsAPI({ id: route.params.id, type: 1 }) goodList.value = res.result } getHotList() </script> <template> <div class="goods-hot"> <h3> 24小时热榜 </h3> <!-- 商品区块 --> <RouterLink :to="`/detail/${item.id}`" class="goods-item" v-for="item in goodList" :key="item.id"> <img :src="item.picture" alt="" /> <p class="name ellipsis">{{ item.name }}</p> <p class="desc ellipsis">{{ item.desc }}</p> <p class="price">¥{{ item.price }}</p> </RouterLink> </div> </template>
2. 适配热榜类型 1- 设计props参数type
1 2 3 4 5 6 7 8 9 10 11 12 13 const props = defineProps ({ type : { type : Number , default : 1 } }) const res = await fetchHotGoodsAPI ({ id : route.params .id , type : props.type })
2- 使用组件传入不同的type
1 2 3 4 <!-- 24小时热榜 --> <GoodHot :type="1" /> <!-- 周热榜 --> <GoodHot :type="2" />
3. 适配热榜title 1 2 3 4 5 6 7 const TITLEMAP = { 1 : '24小时热榜' , 2 : '周热榜' , } const title = computed (() => TITLEMAP [props.type ])<h3>{{ title }}</h3>
图片预览组件封装 1. 小图切换大图显示 1- 准备模版
1 2 3 4 5 6 7 8 9 10 11 12 13 14 15 16 17 18 19 20 21 22 23 24 25 26 27 28 29 30 31 32 33 34 35 36 37 38 39 40 41 42 43 44 45 46 47 48 49 50 51 52 53 54 55 56 57 58 59 60 61 62 63 64 65 66 67 68 69 70 71 72 73 74 75 76 77 78 79 80 81 82 83 84 85 86 87 88 89 90 91 92 <script setup> // 图片列表 const imageList = [ "https://yanxuan-item.nosdn.127.net/d917c92e663c5ed0bb577c7ded73e4ec.png", "https://yanxuan-item.nosdn.127.net/e801b9572f0b0c02a52952b01adab967.jpg", "https://yanxuan-item.nosdn.127.net/b52c447ad472d51adbdde1a83f550ac2.jpg", "https://yanxuan-item.nosdn.127.net/f93243224dc37674dfca5874fe089c60.jpg", "https://yanxuan-item.nosdn.127.net/f881cfe7de9a576aaeea6ee0d1d24823.jpg" ] </script> <template> <div class="goods-image"> <!-- 左侧大图--> <div class="middle" ref="target"> <img :src="imageList[0]" alt="" /> <!-- 蒙层小滑块 --> <div class="layer" :style="{ left: `0px`, top: `0px` }"></div> </div> <!-- 小图列表 --> <ul class="small"> <li v-for="(img, i) in imageList" :key="i"> <img :src="img" alt="" /> </li> </ul> <!-- 放大镜大图 --> <div class="large" :style="[ { backgroundImage: `url(${imageList[0]})`, backgroundPositionX: `0px`, backgroundPositionY: `0px`, }, ]" v-show="false"></div> </div> </template> <style scoped lang="scss"> .goods-image { width: 480px; height: 400px; position: relative; display: flex; .middle { width: 400px; height: 400px; background: #f5f5f5; } .large { position: absolute; top: 0; left: 412px; width: 400px; height: 400px; z-index: 500; box-shadow: 0 0 10px rgba(0, 0, 0, 0.1); background-repeat: no-repeat; // 背景图:盒子的大小 = 2:1 将来控制背景图的移动来实现放大的效果查看 background-position background-size: 800px 800px; background-color: #f8f8f8; } .layer { width: 200px; height: 200px; background: rgba(0, 0, 0, 0.2); // 绝对定位 然后跟随咱们鼠标控制left和top属性就可以让滑块移动起来 left: 0; top: 0; position: absolute; } .small { width: 80px; li { width: 68px; height: 68px; margin-left: 12px; margin-bottom: 15px; cursor: pointer; &:hover, &.active { border: 2px solid $xtxColor; } } } } </style>
2- 实现逻辑
1 2 3 4 5 6 7 8 9 10 11 12 13 14 15 16 17 18 19 20 21 22 23 24 25 <script setup> import { ref } from 'vue' // 实现鼠标移入交互 const curIndex = ref(0) const mouseEnterFn = (i) => curIndex.value = i </script> <template> <div class="goods-image"> <!-- 小图列表 --> <ul class="small"> <li v-for="(img, i) in imageList" :key="i" @mouseenter="mouseEnterFn(i)" :class="{ active: i === curIndex }"> <img :src="img" alt="" /> </li> </ul> </div> </template>
2. 放大镜效果实现 1 2 3 4 5 6 7 8 9 10 11 12 13 14 15 16 17 18 19 20 21 22 23 24 25 26 27 28 29 30 31 32 33 34 35 36 37 38 39 40 41 42 43 44 45 46 47 48 49 50 51 52 53 54 55 56 57 58 59 60 61 62 63 64 65 66 67 68 69 70 71 72 73 74 75 76 77 78 79 80 81 82 83 84 85 86 87 88 89 90 91 92 93 94 95 96 97 98 99 100 101 102 103 104 105 106 107 108 109 110 111 112 113 114 115 116 117 118 119 120 121 122 123 124 125 126 127 128 129 130 131 132 133 134 135 136 137 138 139 140 141 142 <script setup> import { ref, watch } from 'vue' import { useMouseInElement } from '@vueuse/core' // 图片列表 const imageList = [ "https://yanxuan-item.nosdn.127.net/d917c92e663c5ed0bb577c7ded73e4ec.png", "https://yanxuan-item.nosdn.127.net/e801b9572f0b0c02a52952b01adab967.jpg", "https://yanxuan-item.nosdn.127.net/b52c447ad472d51adbdde1a83f550ac2.jpg", "https://yanxuan-item.nosdn.127.net/f93243224dc37674dfca5874fe089c60.jpg", "https://yanxuan-item.nosdn.127.net/f881cfe7de9a576aaeea6ee0d1d24823.jpg" ] // 1.小图切换大图显示 const activeIndex = ref(0) const enterhandler = (i) => { activeIndex.value = i } // 2. 获取鼠标相对位置 const target = ref(null) const { elementX, elementY, isOutside } = useMouseInElement(target) // 3. 控制滑块跟随鼠标移动(监听elementX/Y变化,一旦变化 重新设置left/top) const left = ref(0) const top = ref(0) const positionX = ref(0) const positionY = ref(0) watch([elementX, elementY, isOutside], () => { console.log('xy变化了') // 如果鼠标没有移入到盒子里面 直接不执行后面的逻辑 if (isOutside.value) return console.log('后续逻辑执行了') // 有效范围内控制滑块距离 // 横向 if (elementX.value > 100 && elementX.value < 300) { left.value = elementX.value - 100 } // 纵向 if (elementY.value > 100 && elementY.value < 300) { top.value = elementY.value - 100 } // 处理边界 if (elementX.value > 300) { left.value = 200 } if (elementX.value < 100) { left.value = 0 } if (elementY.value > 300) { top.value = 200 } if (elementY.value < 100) { top.value = 0 } // 控制大图的显示 positionX.value = -left.value * 2 positionY.value = -top.value * 2 }) </script> <template> <div class="goods-image"> <!-- 左侧大图--> <div class="middle" ref="target"> <img :src="imageList[activeIndex]" alt="" /> <!-- 蒙层小滑块 --> <div class="layer" v-show="!isOutside" :style="{ left: `${left}px`, top: `${top}px` }"></div> </div> <!-- 小图列表 --> <ul class="small"> <li v-for="(img, i) in imageList" :key="i" @mouseenter="enterhandler(i)" :class="{ active: i === activeIndex }"> <img :src="img" alt="" /> </li> </ul> <!-- 放大镜大图 --> <div class="large" :style="[ { backgroundImage: `url(${imageList[0]})`, backgroundPositionX: `${positionX}px`, backgroundPositionY: `${positionY}px`, }, ]" v-show="!isOutside"></div> </div> </template> <style scoped lang="scss"> .goods-image { width: 480px; height: 400px; position: relative; display: flex; .middle { width: 400px; height: 400px; background: #f5f5f5; } .large { position: absolute; top: 0; left: 412px; width: 400px; height: 400px; z-index: 500; box-shadow: 0 0 10px rgba(0, 0, 0, 0.1); background-repeat: no-repeat; // 背景图:盒子的大小 = 2:1 将来控制背景图的移动来实现放大的效果查看 background-position background-size: 800px 800px; background-color: #f8f8f8; } .layer { width: 200px; height: 200px; background: rgba(0, 0, 0, 0.2); // 绝对定位 然后跟随咱们鼠标控制left和top属性就可以让滑块移动起来 left: 0; top: 0; position: absolute; } .small { width: 80px; li { width: 68px; height: 68px; margin-left: 12px; margin-bottom: 15px; cursor: pointer; &:hover, &.active { border: 2px solid $xtxColor; } } } } </style>
SKU组件熟悉 全局组件统一插件化 1. 插件化开发 1 2 3 4 5 6 7 8 9 10 11 import ImageView from './ImageView/index.vue' import Sku from './XtxSku/index.vue' export const componentPlugin = { install (app) { app.component ('XtxImageView' , ImageView ) app.component ('XtxSku' , Sku ) } }
2. 插件注册 1 2 3 4 // 引入全局组件插件 import { componentPlugin } from '@/components' app.use(componentPlugin)
整体认识和路由配置 1. 准备模版 1 2 3 4 5 6 7 8 9 10 11 12 13 14 15 16 17 18 19 20 21 22 23 24 25 26 27 28 29 30 31 32 33 34 35 36 37 38 39 40 41 42 43 44 45 46 47 48 49 50 51 52 53 54 55 56 57 58 59 60 61 62 63 64 65 66 67 68 69 70 71 72 73 74 75 76 77 78 79 80 81 82 83 84 85 86 87 88 89 90 91 92 93 94 95 96 97 98 99 100 101 102 103 104 105 106 107 108 109 110 111 112 113 114 115 116 117 118 119 120 121 122 123 124 125 126 127 128 129 130 131 132 133 134 135 136 137 138 139 140 141 142 143 144 145 146 147 148 149 150 151 152 153 154 155 156 157 158 159 160 161 162 163 164 165 166 167 168 169 170 171 172 173 174 175 176 177 178 179 180 181 182 183 184 185 186 187 188 189 190 191 192 193 194 195 196 197 198 199 200 201 202 203 204 205 206 207 208 209 210 211 212 213 214 215 216 217 218 219 220 221 222 223 224 225 226 227 228 229 230 231 232 233 234 235 236 237 238 239 240 241 242 243 244 245 246 247 248 249 250 251 252 253 254 255 256 257 258 259 260 261 262 263 264 265 266 267 268 269 270 271 272 273 274 275 276 277 278 279 280 281 282 283 284 285 286 287 288 289 290 <script setup> </script> <template> <div> <header class="login-header"> <div class="container m-top-20"> <h1 class="logo"> <RouterLink to="/">小兔鲜</RouterLink> </h1> <RouterLink class="entry" to="/"> 进入网站首页 <i class="iconfont icon-angle-right"></i> <i class="iconfont icon-angle-right"></i> </RouterLink> </div> </header> <section class="login-section"> <div class="wrapper"> <nav> <a href="javascript:;">账户登录</a> </nav> <div class="account-box"> <div class="form"> <el-form label-position="right" label-width="60px" status-icon> <el-form-item label="账户"> <el-input/> </el-form-item> <el-form-item label="密码"> <el-input/> </el-form-item> <el-form-item label-width="22px"> <el-checkbox size="large"> 我已同意隐私条款和服务条款 </el-checkbox> </el-form-item> <el-button size="large" class="subBtn">点击登录</el-button> </el-form> </div> </div> </div> </section> <footer class="login-footer"> <div class="container"> <p> <a href="javascript:;">关于我们</a> <a href="javascript:;">帮助中心</a> <a href="javascript:;">售后服务</a> <a href="javascript:;">配送与验收</a> <a href="javascript:;">商务合作</a> <a href="javascript:;">搜索推荐</a> <a href="javascript:;">友情链接</a> </p> <p>CopyRight © 小兔鲜儿</p> </div> </footer> </div> </template> <style scoped lang='scss'> .login-header { background: #fff; border-bottom: 1px solid #e4e4e4; .container { display: flex; align-items: flex-end; justify-content: space-between; } .logo { width: 200px; a { display: block; height: 132px; width: 100%; text-indent: -9999px; background: url("@/assets/images/logo.png") no-repeat center 18px / contain; } } .sub { flex: 1; font-size: 24px; font-weight: normal; margin-bottom: 38px; margin-left: 20px; color: #666; } .entry { width: 120px; margin-bottom: 38px; font-size: 16px; i { font-size: 14px; color: $xtxColor; letter-spacing: -5px; } } } .login-section { background: url('@/assets/images/login-bg.png') no-repeat center / cover; height: 488px; position: relative; .wrapper { width: 380px; background: #fff; position: absolute; left: 50%; top: 54px; transform: translate3d(100px, 0, 0); box-shadow: 0 0 10px rgba(0, 0, 0, 0.15); nav { font-size: 14px; height: 55px; margin-bottom: 20px; border-bottom: 1px solid #f5f5f5; display: flex; padding: 0 40px; text-align: right; align-items: center; a { flex: 1; line-height: 1; display: inline-block; font-size: 18px; position: relative; text-align: center; } } } } .login-footer { padding: 30px 0 50px; background: #fff; p { text-align: center; color: #999; padding-top: 20px; a { line-height: 1; padding: 0 10px; color: #999; display: inline-block; ~a { border-left: 1px solid #ccc; } } } } .account-box { .toggle { padding: 15px 40px; text-align: right; a { color: $xtxColor; i { font-size: 14px; } } } .form { padding: 0 20px 20px 20px; &-item { margin-bottom: 28px; .input { position: relative; height: 36px; >i { width: 34px; height: 34px; background: #cfcdcd; color: #fff; position: absolute; left: 1px; top: 1px; text-align: center; line-height: 34px; font-size: 18px; } input { padding-left: 44px; border: 1px solid #cfcdcd; height: 36px; line-height: 36px; width: 100%; &.error { border-color: $priceColor; } &.active, &:focus { border-color: $xtxColor; } } .code { position: absolute; right: 1px; top: 1px; text-align: center; line-height: 34px; font-size: 14px; background: #f5f5f5; color: #666; width: 90px; height: 34px; cursor: pointer; } } >.error { position: absolute; font-size: 12px; line-height: 28px; color: $priceColor; i { font-size: 14px; margin-right: 2px; } } } .agree { a { color: #069; } } .btn { display: block; width: 100%; height: 40px; color: #fff; text-align: center; line-height: 40px; background: $xtxColor; &.disabled { background: #cfcdcd; } } } .action { padding: 20px 40px; display: flex; justify-content: space-between; align-items: center; .url { a { color: #999; margin-left: 10px; } } } } .subBtn { background: $xtxColor; width: 100%; color: #fff; } </style>
2. 配置路由跳转 1 <li><a href="javascript:;" @click="router.push('/login')">请先登录</a></li>
表单校验实现 1. 校验要求
用户名:不能为空,字段名为 account
用户名和密码只需简单配置
同意协议 使用自定义规则 validator:(rule,value,callback) =>{} 无错就直接callback() 有错callback(new Error(错误信息))
登陆之前表单进行统一校验,通过调用form表单实例对象的方法validate
2. 代码实现 1 2 3 4 5 6 7 8 9 10 11 12 13 14 15 16 17 18 19 20 21 22 23 24 25 26 27 28 29 30 31 32 33 34 35 36 37 38 39 40 41 42 43 44 45 46 47 48 49 50 <script setup> import { ref } from 'vue' // 表单数据对象 const userInfo = ref({ account: '1311111111', password: '123456', agree: true }) // 规则数据对象 const rules = { account: [ { required: true, message: '用户名不能为空' } ], password: [ { required: true, message: '密码不能为空' }, { min: 6, max: 24, message: '密码长度要求6-14个字符' } ], agree: [ { validator: (rule, val, callback) => { return val ? callback() : new Error('请先同意协议') } } ] } </script> <template> <div class="form"> <el-form ref="formRef" :model="userInfo" :rules="rules" status-icon> <el-form-item prop="account" label="账户"> <el-input v-model="userInfo.account" /> </el-form-item> <el-form-item prop="password" label="密码"> <el-input v-model="userInfo.password" /> </el-form-item> <el-form-item prop="agree" label-width="22px"> <el-checkbox v-model="userInfo.agree" size="large"> 我已同意隐私条款和服务条款 </el-checkbox> </el-form-item> <el-button size="large" class="subBtn" >点击登录</el-button> </el-form> </div> </template>
登录基础业务实现
基础思想
调用登录接口获取用户信息
提示用户当前是否成功
跳转到首页
1 2 3 4 5 6 7 8 9 10 11 12 13 14 15 16 17 18 19 20 21 import { ElMessage } from 'element-plus' import 'element-plus/theme-chalk/el-message.css' const doLogin = ( const { account, password } = form.value formRef.value .validate (async (valid) => { console .log (valid) if (valid) { await loginAPI ({ account, password }) ElMessage ({ type : 'success' , message : '登录成功' }) router.replace ({ path : '/' }) } }) }
Pinia管理用户数据
基本思想:Pinia负责用户数据相关的state和action,组件中只负责触发action函数并传递参数
1 2 3 4 5 6 7 8 9 10 11 12 13 14 15 16 17 18 19 20 21 import { defineStore } from 'pinia' import { ref } from 'vue' import { loginAPI } from '@/apis/user' export const useUserStore = defineStore ('user' , () => { const userInfo = ref ({}) const getUserInfo = async ({ account, password } ) => { const res = await loginAPI ({ account, password }) userInfo.value = res.result } return { getUserInfo } }, { persist : true , })
请求拦截器携带token
基础思想:很多接口如果想要获取数据必须要带着有效的Token信息才可以,拦截器中做一次,用到axios实例的其他都可以拿到
1 2 3 4 5 6 7 8 9 10 11 httpInstance.interceptors .request .use (config => const userStore = useUserStore () const token = userStore.userInfo .token if (token) { config.headers .Authorization = `Bearer ${token} ` } return config }, e =>Promise .reject (e))
退出登录实现
基础思想:
清除用户信息
跳转到登录页
1- 新增清除用户信息action
1 2 3 4 const clearUserInfo = ( userInfo.value = {} }
2- 组件中执行业务逻辑
1 2 3 4 5 6 7 8 9 10 11 12 13 14 <script setup> import { useUserStore } from '@/stores/userStore' import { useRouter } from 'vue-router' const userStore = useUserStore() const router = useRouter() const confirm = () => { console.log('用户要退出登录了') // 退出登录业务逻辑实现 // 1.清除用户信息 触发action userStore.clearUserInfo() // 2.跳转到登录页 router.push('/login') } </script>
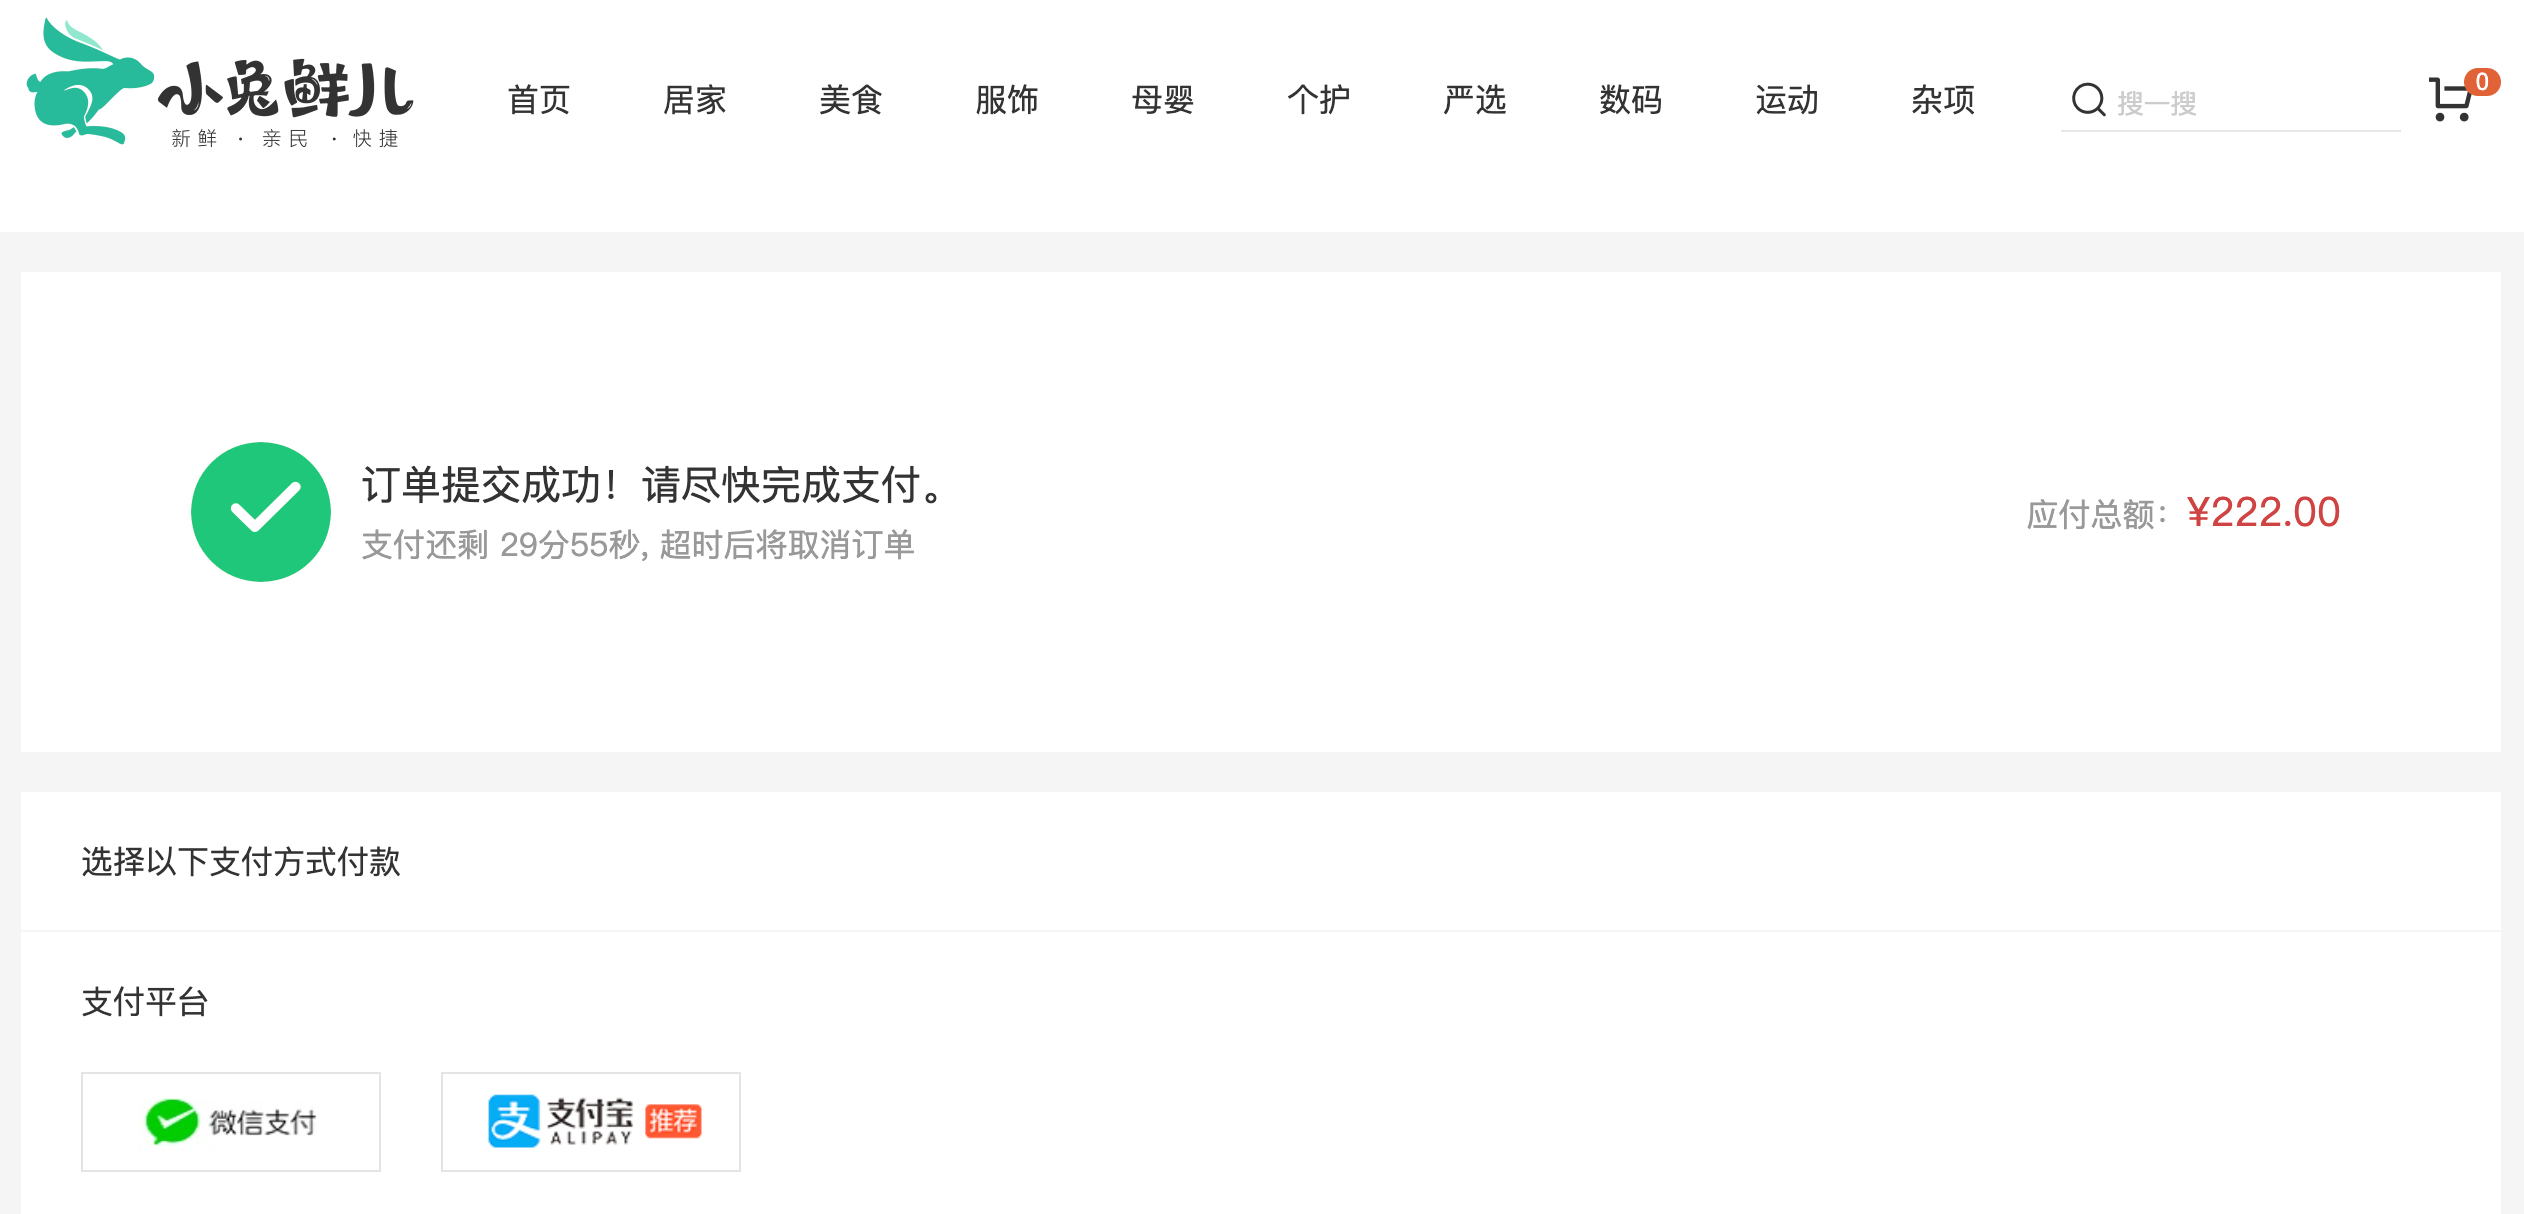
本地购物车 1. 添加购物车
基础思想:如果已经添加过相同的商品,就在其数量count上加一,如果没有添加过,就直接push到购物车列表中
1 2 3 4 5 6 7 8 9 10 11 12 13 14 15 16 17 18 19 20 21 22 23 24 25 26 27 28 29 30 31 32 import { defineStore } from 'pinia' import { ref } from 'vue' export const useCartStore = defineStore ('cart' , () => { const cartList = ref ([]) const addCart = (goods ) => { console .log ('添加' , goods) const item = cartList.value .find ((item ) => goods.skuId === item.skuId ) if (item) { item.count ++ } else { cartList.value .push (goods) } } return { cartList, addCart } }, { persist : true , })
2. 头部购物车 2.1. 头部购物车组件模版 1 2 3 4 5 6 7 8 9 10 11 12 13 14 15 16 17 18 19 20 21 22 23 24 25 26 27 28 29 30 31 32 33 34 35 36 37 38 39 40 41 42 43 44 45 46 47 48 49 50 51 52 53 54 55 56 57 58 59 60 61 62 63 64 65 66 67 68 69 70 71 72 73 74 75 76 77 78 79 80 81 82 83 84 85 86 87 88 89 90 91 92 93 94 95 96 97 98 99 100 101 102 103 104 105 106 107 108 109 110 111 112 113 114 115 116 117 118 119 120 121 122 123 124 125 126 127 128 129 130 131 132 133 134 135 136 137 138 139 140 141 142 143 144 145 146 147 148 149 150 151 152 153 154 155 156 157 158 159 160 161 162 163 164 165 166 167 168 169 170 171 172 173 174 175 176 177 178 179 180 181 182 183 184 185 186 187 188 189 190 191 192 193 194 195 196 197 198 199 200 201 202 203 204 205 206 207 208 209 210 211 212 213 214 215 216 217 218 219 220 221 <script setup> </script> <template> <div class="cart"> <a class="curr" href="javascript:;"> <i class="iconfont icon-cart"></i><em>2</em> </a> <div class="layer"> <div class="list"> <!-- <div class="item" v-for="i in cartList" :key="i"> <RouterLink to=""> <img :src="i.picture" alt="" /> <div class="center"> <p class="name ellipsis-2"> {{ i.name }} </p> <p class="attr ellipsis">{{ i.attrsText }}</p> </div> <div class="right"> <p class="price">¥{{ i.price }}</p> <p class="count">x{{ i.count }}</p> </div> </RouterLink> <i class="iconfont icon-close-new" @click="store.delCart(i.skuId)"></i> </div> --> </div> <div class="foot"> <div class="total"> <p>共 10 件商品</p> <p>¥ 100.00 </p> </div> <el-button size="large" type="primary" >去购物车结算</el-button> </div> </div> </div> </template> <style scoped lang="scss"> .cart { width: 50px; position: relative; z-index: 600; .curr { height: 32px; line-height: 32px; text-align: center; position: relative; display: block; .icon-cart { font-size: 22px; } em { font-style: normal; position: absolute; right: 0; top: 0; padding: 1px 6px; line-height: 1; background: $helpColor; color: #fff; font-size: 12px; border-radius: 10px; font-family: Arial; } } &:hover { .layer { opacity: 1; transform: none; } } .layer { opacity: 0; transition: all 0.4s 0.2s; transform: translateY(-200px) scale(1, 0); width: 400px; height: 400px; position: absolute; top: 50px; right: 0; box-shadow: 0 0 10px rgba(0, 0, 0, 0.2); background: #fff; border-radius: 4px; padding-top: 10px; &::before { content: ""; position: absolute; right: 14px; top: -10px; width: 20px; height: 20px; background: #fff; transform: scale(0.6, 1) rotate(45deg); box-shadow: -3px -3px 5px rgba(0, 0, 0, 0.1); } .foot { position: absolute; left: 0; bottom: 0; height: 70px; width: 100%; padding: 10px; display: flex; justify-content: space-between; background: #f8f8f8; align-items: center; .total { padding-left: 10px; color: #999; p { &:last-child { font-size: 18px; color: $priceColor; } } } } } .list { height: 310px; overflow: auto; padding: 0 10px; &::-webkit-scrollbar { width: 10px; height: 10px; } &::-webkit-scrollbar-track { background: #f8f8f8; border-radius: 2px; } &::-webkit-scrollbar-thumb { background: #eee; border-radius: 10px; } &::-webkit-scrollbar-thumb:hover { background: #ccc; } .item { border-bottom: 1px solid #f5f5f5; padding: 10px 0; position: relative; i { position: absolute; bottom: 38px; right: 0; opacity: 0; color: #666; transition: all 0.5s; } &:hover { i { opacity: 1; cursor: pointer; } } a { display: flex; align-items: center; img { height: 80px; width: 80px; } .center { padding: 0 10px; width: 200px; .name { font-size: 16px; } .attr { color: #999; padding-top: 5px; } } .right { width: 100px; padding-right: 20px; text-align: center; .price { font-size: 16px; color: $priceColor; } .count { color: #999; margin-top: 5px; font-size: 16px; } } } } } } </style>
2.2 渲染头部购物车数据 1 2 3 4 5 6 7 8 9 10 11 12 13 14 15 16 17 18 19 20 21 22 23 24 25 26 27 28 29 30 31 32 33 34 35 36 37 38 39 40 41 42 <script setup> import { useCartStore } from '@/stores/cartStore' const cartStore = useCartStore() </script> <template> <div class="cart"> <a class="curr" href="javascript:;"> <i class="iconfont icon-cart"></i><em>{{ cartStore.cartList.length }}</em> </a> <div class="layer"> <div class="list"> <div class="item" v-for="i in cartStore.cartList" :key="i"> <RouterLink to=""> <img :src="i.picture" alt="" /> <div class="center"> <p class="name ellipsis-2"> {{ i.name }} </p> <p class="attr ellipsis">{{ i.attrsText }}</p> </div> <div class="right"> <p class="price">¥{{ i.price }}</p> <p class="count">x{{ i.count }}</p> </div> </RouterLink> <i class="iconfont icon-close-new" @click="cartStore.delCart(i.skuId)"></i> </div> </div> <div class="foot"> <div class="total"> <p>共 {{ cartStore.allCount }} 件商品</p> <p>¥ {{ cartStore.allPrice.toFixed(2) }} </p> </div> <el-button size="large" type="primary" @click="$router.push('/cartlist')">去购物车结算</el-button> </div> </div> </div> </template>
2.3 删除功能实现 1- 添加删除action函数
1 2 3 4 5 6 7 8 const delCart = async (skuId ) => { const idx = cartList.value .findIndex ((item ) => skuId === item.skuId ) cartList.value .splice (idx, 1 ) }
2- 组件触发action函数并传递参数
1 <i class="iconfont icon-close-new" @click="cartStore.delCart(i.skuId)"></i>
3. 列表购物车-基础内容渲染 3.1. 准备模版 1 2 3 4 5 6 7 8 9 10 11 12 13 14 15 16 17 18 19 20 21 22 23 24 25 26 27 28 29 30 31 32 33 34 35 36 37 38 39 40 41 42 43 44 45 46 47 48 49 50 51 52 53 54 55 56 57 58 59 60 61 62 63 64 65 66 67 68 69 70 71 72 73 74 75 76 77 78 79 80 81 82 83 84 85 86 87 88 89 90 91 92 93 94 95 96 97 98 99 100 101 102 103 104 105 106 107 108 109 110 111 112 113 114 115 116 117 118 119 120 121 122 123 124 125 126 127 128 129 130 131 132 133 134 135 136 137 138 139 140 141 142 143 144 145 146 147 148 149 150 151 152 153 154 155 156 157 158 159 160 161 162 163 164 165 166 167 168 169 170 171 172 173 174 175 176 177 178 179 180 181 182 183 184 185 186 187 188 189 190 191 192 193 194 195 196 197 198 199 200 201 202 203 204 205 206 207 208 209 <script setup> const cartList = [] </script> <template> <div class="xtx-cart-page"> <div class="container m-top-20"> <div class="cart"> <table> <thead> <tr> <th width="120"> <el-checkbox/> </th> <th width="400">商品信息</th> <th width="220">单价</th> <th width="180">数量</th> <th width="180">小计</th> <th width="140">操作</th> </tr> </thead> <!-- 商品列表 --> <tbody> <tr v-for="i in cartList" :key="i.id"> <td> <el-checkbox /> </td> <td> <div class="goods"> <RouterLink to="/"><img :src="i.picture" alt="" /></RouterLink> <div> <p class="name ellipsis"> {{ i.name }} </p> </div> </div> </td> <td class="tc"> <p>¥{{ i.price }}</p> </td> <td class="tc"> <el-input-number v-model="i.count" /> </td> <td class="tc"> <p class="f16 red">¥{{ (i.price * i.count).toFixed(2) }}</p> </td> <td class="tc"> <p> <el-popconfirm title="确认删除吗?" confirm-button-text="确认" cancel-button-text="取消" @confirm="delCart(i)"> <template #reference> <a href="javascript:;">删除</a> </template> </el-popconfirm> </p> </td> </tr> <tr v-if="cartList.length === 0"> <td colspan="6"> <div class="cart-none"> <el-empty description="购物车列表为空"> <el-button type="primary">随便逛逛</el-button> </el-empty> </div> </td> </tr> </tbody> </table> </div> <!-- 操作栏 --> <div class="action"> <div class="batch"> 共 10 件商品,已选择 2 件,商品合计: <span class="red">¥ 200.00 </span> </div> <div class="total"> <el-button size="large" type="primary" >下单结算</el-button> </div> </div> </div> </div> </template> <style scoped lang="scss"> .xtx-cart-page { margin-top: 20px; .cart { background: #fff; color: #666; table { border-spacing: 0; border-collapse: collapse; line-height: 24px; th, td { padding: 10px; border-bottom: 1px solid #f5f5f5; &:first-child { text-align: left; padding-left: 30px; color: #999; } } th { font-size: 16px; font-weight: normal; line-height: 50px; } } } .cart-none { text-align: center; padding: 120px 0; background: #fff; p { color: #999; padding: 20px 0; } } .tc { text-align: center; a { color: $xtxColor; } .xtx-numbox { margin: 0 auto; width: 120px; } } .red { color: $priceColor; } .green { color: $xtxColor; } .f16 { font-size: 16px; } .goods { display: flex; align-items: center; img { width: 100px; height: 100px; } >div { width: 280px; font-size: 16px; padding-left: 10px; .attr { font-size: 14px; color: #999; } } } .action { display: flex; background: #fff; margin-top: 20px; height: 80px; align-items: center; font-size: 16px; justify-content: space-between; padding: 0 30px; .xtx-checkbox { color: #999; } .batch { a { margin-left: 20px; } } .red { font-size: 18px; margin-right: 20px; font-weight: bold; } } .tit { color: #666; font-size: 16px; font-weight: normal; line-height: 50px; } } </style>
3.2. 绑定路由 1 2 3 4 5 6 import CartList from '@/views/CartList/index.vue' { path : 'cartlist' , component : CartList }
3.3. 渲染列表 1 2 3 4 5 6 7 8 9 10 11 12 13 14 15 16 17 18 19 20 21 22 23 24 25 26 27 28 29 30 31 32 33 34 35 36 37 38 39 40 41 42 43 44 45 46 47 48 49 50 51 52 53 54 55 56 57 58 59 60 61 62 63 64 65 66 67 68 69 70 71 72 73 74 75 76 77 78 79 80 81 82 83 84 <script setup> import { useCartStore } from '@/stores/cartStore' const cartStore = useCartStore() </script> <template> <div class="xtx-cart-page"> <div class="container m-top-20"> <div class="cart"> <table> <thead> <tr> <th width="120"> <el-checkbox /> </th> <th width="400">商品信息</th> <th width="220">单价</th> <th width="180">数量</th> <th width="180">小计</th> <th width="140">操作</th> </tr> </thead> <!-- 商品列表 --> <tbody> <tr v-for="i in cartStore.cartList" :key="i.id"> <td> <!-- 单选框 --> <el-checkbox/> </td> <td> <div class="goods"> <RouterLink to="/"><img :src="i.picture" alt="" /></RouterLink> <div> <p class="name ellipsis"> {{ i.name }} </p> </div> </div> </td> <td class="tc"> <p>¥{{ i.price }}</p> </td> <td class="tc"> <el-input-number v-model="i.count" /> </td> <td class="tc"> <p class="f16 red">¥{{ (i.price * i.count).toFixed(2) }}</p> </td> <td class="tc"> <p> <el-popconfirm title="确认删除吗?" confirm-button-text="确认" cancel-button-text="取消" @confirm="delCart(i)"> <template #reference> <a href="javascript:;">删除</a> </template> </el-popconfirm> </p> </td> </tr> <tr v-if="cartStore.cartList.length === 0"> <td colspan="6"> <div class="cart-none"> <el-empty description="购物车列表为空"> <el-button type="primary">随便逛逛</el-button> </el-empty> </div> </td> </tr> </tbody> </table> </div> <!-- 操作栏 --> <div class="action"> <div class="batch"> 共 10 件商品,已选择 2 件,商品合计: <span class="red">¥ 200.00 </span> </div> <div class="total"> <el-button size="large" type="primary" >下单结算</el-button> </div> </div> </div> </div> </template>
4. 列表购物车-单选功能实现
基本思想:通过skuId找到要进行单选操作的商品,把控制是否选中的selected字段修改为当前单选框的状态
1- 添加单选action
1 2 3 4 5 6 const singleCheck = (skuId, selected ) => { const item = cartList.value .find ((item ) => item.skuId === skuId) item.selected = selected }
2- 触发action函数
1 2 3 4 5 6 7 8 9 10 11 12 13 14 15 16 17 <script setup> // 单选回调 const singleCheck = (i, selected) => { console.log(i, selected) // store cartList 数组 无法知道要修改谁的选中状态? // 除了selected补充一个用来筛选的参数 - skuId cartStore.singleCheck(i.skuId, selected) } </script> <template> <td> <!-- 单选框 --> <el-checkbox :model-value="i.selected" @change="(selected) => singleCheck(i, selected)" /> </td> </template>
5. 列表购物车-全选功能实现
基础思想:
全选状态决定单选框状态 - 遍历cartList把每一项的selected都设置为何全选框状态一致
单选框状态决定全选状态 - 只有所有单选框的selected都为true, 全选框才为true
1- store中定义action和计算属性
1 2 3 4 5 6 7 8 9 const allCheck = (selected ) => { cartList.value .forEach (item =>selected = selected) } const isAll = computed (() => cartList.value .every ((item ) => item.selected ))
2- 组件中触发aciton和使用计算属性
1 2 3 4 5 6 7 8 9 10 11 12 <script setup> const allCheck = (selected) => { cartStore.allCheck(selected) } </script> <template> <!-- 全选框 --> <el-checkbox :model-value="cartStore.isAll" @change="allCheck" /> </template>
6. 列表购物车-统计数据功能实现 1 2 3 4 const selectedCount = computed (() => cartList.value .filter (item =>selected ).reduce ((a, c ) => a + c.count , 0 ))const selectedPrice = computed (() => cartList.value .filter (item =>selected ).reduce ((a, c ) => a + c.count * c.price , 0 ))
接口购物车 1. 加入购物车 1-接口封装
1 2 3 4 5 6 7 8 9 10 11 12 export const insertCartAPI = ({ skuId, count } ) => { return request ({ url : '/member/cart' , method : 'POST' , data : { skuId, count } }) }
2- action中适配登录和非登录
1 2 3 4 5 6 7 8 9 10 11 12 13 14 15 16 17 18 19 20 21 22 23 24 25 26 27 28 29 import { defineStore } from 'pinia' import { useUserStore } from './userStore' import { insertCartAPI } from '@/apis/cart' export const useCartStore = defineStore ('cart' , () => { const userStore = useUserStore () const isLogin = computed (() => userStore.userInfo .token ) const addCart = async (goods ) => { const { skuId, count } = goods if (isLogin.value ) { await insertCartAPI ({ skuId, count }) updateNewList () } else { const item = cartList.value .find ((item ) => goods.skuId === item.skuId ) if (item) { item.count ++ } else { cartList.value .push (goods) } } } }, { persist : true , })
2. 删除购物车 1- 封装接口
1 2 3 4 5 6 7 8 9 10 export const delCartAPI = (ids ) => { return request ({ url : '/member/cart' , method : 'DELETE' , data : { ids } }) }
2- action中适配登录和非登录
1 2 3 4 5 6 7 8 9 10 11 12 13 14 const delCart = async (skuId ) => { if (isLogin.value ) { await delCartAPI ([skuId]) updateNewList () } else { const idx = cartList.value .findIndex ((item ) => skuId === item.skuId ) cartList.value .splice (idx, 1 ) } }
路由配置和基础数据渲染 1. 准备组件模版 1 2 3 4 5 6 7 8 9 10 11 12 13 14 15 16 17 18 19 20 21 22 23 24 25 26 27 28 29 30 31 32 33 34 35 36 37 38 39 40 41 42 43 44 45 46 47 48 49 50 51 52 53 54 55 56 57 58 59 60 61 62 63 64 65 66 67 68 69 70 71 72 73 74 75 76 77 78 79 80 81 82 83 84 85 86 87 88 89 90 91 92 93 94 95 96 97 98 99 100 101 102 103 104 105 106 107 108 109 110 111 112 113 114 115 116 117 118 119 120 121 122 123 124 125 126 127 128 129 130 131 132 133 134 135 136 137 138 139 140 141 142 143 144 145 146 147 148 149 150 151 152 153 154 155 156 157 158 159 160 161 162 163 164 165 166 167 168 169 170 171 172 173 174 175 176 177 178 179 180 181 182 183 184 185 186 187 188 189 190 191 192 193 194 195 196 197 198 199 200 201 202 203 204 205 206 207 208 209 210 211 212 213 214 215 216 217 218 219 220 221 222 223 224 225 226 227 228 229 230 231 232 233 234 235 236 237 238 239 240 241 242 243 244 245 246 247 248 249 250 251 252 253 254 255 256 257 258 259 260 261 262 263 264 265 266 267 268 269 270 271 272 273 274 275 276 277 278 279 280 281 282 283 284 285 286 287 288 289 290 291 292 293 294 295 296 297 298 299 300 301 302 303 304 305 306 307 308 309 310 311 312 313 314 315 316 317 318 319 320 <script setup> const checkInfo = {} // 订单对象 const curAddress = {} // 地址对象 </script> <template> <div class="xtx-pay-checkout-page"> <div class="container"> <div class="wrapper"> <!-- 收货地址 --> <h3 class="box-title">收货地址</h3> <div class="box-body"> <div class="address"> <div class="text"> <div class="none" v-if="!curAddress">您需要先添加收货地址才可提交订单。</div> <ul v-else> <li><span>收<i />货<i />人:</span>{{ curAddress.receiver }}</li> <li><span>联系方式:</span>{{ curAddress.contact }}</li> <li><span>收货地址:</span>{{ curAddress.fullLocation }} {{ curAddress.address }}</li> </ul> </div> <div class="action"> <el-button size="large" @click="toggleFlag = true">切换地址</el-button> <el-button size="large" @click="addFlag = true">添加地址</el-button> </div> </div> </div> <!-- 商品信息 --> <h3 class="box-title">商品信息</h3> <div class="box-body"> <table class="goods"> <thead> <tr> <th width="520">商品信息</th> <th width="170">单价</th> <th width="170">数量</th> <th width="170">小计</th> <th width="170">实付</th> </tr> </thead> <tbody> <tr v-for="i in checkInfo.goods" :key="i.id"> <td> <a href="javascript:;" class="info"> <img :src="i.picture" alt=""> <div class="right"> <p>{{ i.name }}</p> <p>{{ i.attrsText }}</p> </div> </a> </td> <td>¥{{ i.price }}</td> <td>{{ i.price }}</td> <td>¥{{ i.totalPrice }}</td> <td>¥{{ i.totalPayPrice }}</td> </tr> </tbody> </table> </div> <!-- 配送时间 --> <h3 class="box-title">配送时间</h3> <div class="box-body"> <a class="my-btn active" href="javascript:;">不限送货时间:周一至周日</a> <a class="my-btn" href="javascript:;">工作日送货:周一至周五</a> <a class="my-btn" href="javascript:;">双休日、假日送货:周六至周日</a> </div> <!-- 支付方式 --> <h3 class="box-title">支付方式</h3> <div class="box-body"> <a class="my-btn active" href="javascript:;">在线支付</a> <a class="my-btn" href="javascript:;">货到付款</a> <span style="color:#999">货到付款需付5元手续费</span> </div> <!-- 金额明细 --> <h3 class="box-title">金额明细</h3> <div class="box-body"> <div class="total"> <dl> <dt>商品件数:</dt> <dd>{{ checkInfo.summary?.goodsCount }}件</dd> </dl> <dl> <dt>商品总价:</dt> <dd>¥{{ checkInfo.summary?.totalPrice.toFixed(2) }}</dd> </dl> <dl> <dt>运<i></i>费:</dt> <dd>¥{{ checkInfo.summary?.postFee.toFixed(2) }}</dd> </dl> <dl> <dt>应付总额:</dt> <dd class="price">{{ checkInfo.summary?.totalPayPrice.toFixed(2) }}</dd> </dl> </div> </div> <!-- 提交订单 --> <div class="submit"> <el-button type="primary" size="large" >提交订单</el-button> </div> </div> </div> </div> <!-- 切换地址 --> <!-- 添加地址 --> </template> <style scoped lang="scss"> .xtx-pay-checkout-page { margin-top: 20px; .wrapper { background: #fff; padding: 0 20px; .box-title { font-size: 16px; font-weight: normal; padding-left: 10px; line-height: 70px; border-bottom: 1px solid #f5f5f5; } .box-body { padding: 20px 0; } } } .address { border: 1px solid #f5f5f5; display: flex; align-items: center; .text { flex: 1; min-height: 90px; display: flex; align-items: center; .none { line-height: 90px; color: #999; text-align: center; width: 100%; } >ul { flex: 1; padding: 20px; li { line-height: 30px; span { color: #999; margin-right: 5px; >i { width: 0.5em; display: inline-block; } } } } >a { color: $xtxColor; width: 160px; text-align: center; height: 90px; line-height: 90px; border-right: 1px solid #f5f5f5; } } .action { width: 420px; text-align: center; .btn { width: 140px; height: 46px; line-height: 44px; font-size: 14px; &:first-child { margin-right: 10px; } } } } .goods { width: 100%; border-collapse: collapse; border-spacing: 0; .info { display: flex; text-align: left; img { width: 70px; height: 70px; margin-right: 20px; } .right { line-height: 24px; p { &:last-child { color: #999; } } } } tr { th { background: #f5f5f5; font-weight: normal; } td, th { text-align: center; padding: 20px; border-bottom: 1px solid #f5f5f5; &:first-child { border-left: 1px solid #f5f5f5; } &:last-child { border-right: 1px solid #f5f5f5; } } } } .my-btn { width: 228px; height: 50px; border: 1px solid #e4e4e4; text-align: center; line-height: 48px; margin-right: 25px; color: #666666; display: inline-block; &.active, &:hover { border-color: $xtxColor; } } .total { dl { display: flex; justify-content: flex-end; line-height: 50px; dt { i { display: inline-block; width: 2em; } } dd { width: 240px; text-align: right; padding-right: 70px; &.price { font-size: 20px; color: $priceColor; } } } } .submit { text-align: right; padding: 60px; border-top: 1px solid #f5f5f5; } .addressWrapper { max-height: 500px; overflow-y: auto; } .text { flex: 1; min-height: 90px; display: flex; align-items: center; &.item { border: 1px solid #f5f5f5; margin-bottom: 10px; cursor: pointer; &.active, &:hover { border-color: $xtxColor; background: lighten($xtxColor, 50%); } >ul { padding: 10px; font-size: 14px; line-height: 30px; } } } </style>
2. 配置路由 3. 封装接口 1 2 3 4 5 6 7 8 9 import request from '@/utils/request' export const getCheckoutInfoAPI = ( return request ({ url :'/member/order/pre' }) }
4. 渲染数据 切换地址-打开弹框交互 1. 准备弹框模版 1 2 3 4 5 6 7 8 9 10 11 12 13 14 15 16 17 <el-dialog title ="切换收货地址" width ="30%" center > <div class ="addressWrapper" > <div class ="text item" v-for ="item in checkInfo.userAddresses" :key ="item.id" > <ul > <li > <span > 收<i /> 货<i /> 人:</span > {{ item.receiver }} </li > <li > <span > 联系方式:</span > {{ item.contact }}</li > <li > <span > 收货地址:</span > {{ item.fullLocation + item.address }}</li > </ul > </div > </div > <template #footer > <span class ="dialog-footer" > <el-button > 取消</el-button > <el-button type ="primary" > 确定</el-button > </span > </template > </el-dialog >
2. 控制弹框打开 1 2 3 4 5 6 7 const showDialog = ref(false) <el-button size="large" @click="showDialog = true">切换地址</el-button> <el-dialog v-model="showDialog" title="切换收货地址" width="30%" center> <!-- 省略 --> </el-dialog>
切换地址-地址切换交互
基础思想:记录当前点击项,通过动态class判断当前div是否有激活类名
1 2 3 4 5 6 7 8 9 10 11 12 13 14 15 16 <script setup> // 切换地址 const activeAddress = ref({}) const switchAddress = (item) => { activeAddress.value = item } </script> <template> <div class="text item" :class="{ active: activeAddress.id === item.id }" @click="switchAddress(item)" :key="item.id"> <!-- 省略... --> </div> </template>
创建订单生成订单ID 1. 准备支付页组件并绑定路由 1 2 3 4 5 6 7 8 9 10 11 12 13 14 15 16 17 18 19 20 21 22 23 24 25 26 27 28 29 30 31 32 33 34 35 36 37 38 39 40 41 42 43 44 45 46 47 48 49 50 51 52 53 54 55 56 57 58 59 60 61 62 63 64 65 66 67 68 69 70 71 72 73 74 75 76 77 78 79 80 81 82 83 84 85 86 87 88 89 90 91 92 93 94 95 96 97 98 99 100 101 102 103 104 105 106 107 108 109 110 111 112 113 114 115 116 117 118 119 120 121 122 123 124 125 126 127 128 129 130 131 132 <script setup> const payInfo = {} </script> <template> <div class="xtx-pay-page"> <div class="container"> <!-- 付款信息 --> <div class="pay-info"> <span class="icon iconfont icon-queren2"></span> <div class="tip"> <p>订单提交成功!请尽快完成支付。</p> <p>支付还剩 <span>24分30秒</span>, 超时后将取消订单</p> </div> <div class="amount"> <span>应付总额:</span> <span>¥{{ payInfo.payMoney?.toFixed(2) }}</span> </div> </div> <!-- 付款方式 --> <div class="pay-type"> <p class="head">选择以下支付方式付款</p> <div class="item"> <p>支付平台</p> <a class="btn wx" href="javascript:;"></a> <a class="btn alipay" :href="payUrl"></a> </div> <div class="item"> <p>支付方式</p> <a class="btn" href="javascript:;">招商银行</a> <a class="btn" href="javascript:;">工商银行</a> <a class="btn" href="javascript:;">建设银行</a> <a class="btn" href="javascript:;">农业银行</a> <a class="btn" href="javascript:;">交通银行</a> </div> </div> </div> </div> </template> <style scoped lang="scss"> .xtx-pay-page { margin-top: 20px; } .pay-info { background: #fff; display: flex; align-items: center; height: 240px; padding: 0 80px; .icon { font-size: 80px; color: #1dc779; } .tip { padding-left: 10px; flex: 1; p { &:first-child { font-size: 20px; margin-bottom: 5px; } &:last-child { color: #999; font-size: 16px; } } } .amount { span { &:first-child { font-size: 16px; color: #999; } &:last-child { color: $priceColor; font-size: 20px; } } } } .pay-type { margin-top: 20px; background-color: #fff; padding-bottom: 70px; p { line-height: 70px; height: 70px; padding-left: 30px; font-size: 16px; &.head { border-bottom: 1px solid #f5f5f5; } } .btn { width: 150px; height: 50px; border: 1px solid #e4e4e4; text-align: center; line-height: 48px; margin-left: 30px; color: #666666; display: inline-block; &.active, &:hover { border-color: $xtxColor; } &.alipay { background: url(https://cdn.cnbj1.fds.api.mi-img.com/mi-mall/7b6b02396368c9314528c0bbd85a2e06.png) no-repeat center / contain; } &.wx { background: url(https://cdn.cnbj1.fds.api.mi-img.com/mi-mall/c66f98cff8649bd5ba722c2e8067c6ca.jpg) no-repeat center / contain; } } } </style>
2. 准备生成订单接口 1 2 3 4 5 6 7 8 export const createOrderAPI = (data ) => { return request ({ url : '/member/order' , method : 'POST' , data }) }
3. 调用接口携带id跳转路由 1 2 3 4 5 6 7 8 9 10 11 12 13 14 15 16 17 18 19 20 21 22 23 24 25 26 27 28 29 30 31 32 33 34 35 <script setup> import { createOrderAPI } from '@/apis/checkout' // 创建订单 const createOrder = async () => { const res = await createOrderAPI({ deliveryTimeType: 1, payType: 1, payChannel: 1, buyerMessage: '', goods: checkInfo.value.goods.map(item => { return { skuId: item.skuId, count: item.count } }), addressId: curAddress.value.id }) const orderId = res.result.id router.push({ path: '/pay', query: { id: orderId } }) } </script> <template> <!-- 提交订单 --> <div class="submit"> <el-button @click="createOrder" type="primary" size="large">提交订单</el-button> </div> </template>
基础数据渲染 1. 准备接口 1 2 3 4 5 6 7 import request from '@/utils/http' export const getOrderAPI = (id ) => { return request ({ url : `/member/order/${id} ` }) }
2. 获取数据渲染内容 1 2 3 4 5 6 7 8 9 10 11 12 13 14 15 16 17 18 19 20 21 22 23 24 25 26 27 28 29 30 31 32 33 34 35 36 37 38 39 40 41 42 43 44 45 46 47 48 49 50 51 <script setup> import { getOrderAPI } from '@/apis/pay' import { onMounted, ref } from 'vue' import { useRoute } from 'vue-router' // 获取订单数据 const route = useRoute() const payInfo = ref({}) const getPayInfo = async () => { const res = await getOrderAPI(route.query.id) payInfo.value = res.result } onMounted(() => getPayInfo()) </script> <template> <div class="xtx-pay-page"> <div class="container"> <!-- 付款信息 --> <div class="pay-info"> <span class="icon iconfont icon-queren2"></span> <div class="tip"> <p>订单提交成功!请尽快完成支付。</p> <p>支付还剩 <span>{{ formatTime }}</span>, 超时后将取消订单</p> </div> <div class="amount"> <span>应付总额:</span> <span>¥{{ payInfo.payMoney?.toFixed(2) }}</span> </div> </div> <!-- 付款方式 --> <div class="pay-type"> <p class="head">选择以下支付方式付款</p> <div class="item"> <p>支付平台</p> <a class="btn wx" href="javascript:;"></a> <a class="btn alipay" :href="payUrl"></a> </div> <div class="item"> <p>支付方式</p> <a class="btn" href="javascript:;">招商银行</a> <a class="btn" href="javascript:;">工商银行</a> <a class="btn" href="javascript:;">建设银行</a> <a class="btn" href="javascript:;">农业银行</a> <a class="btn" href="javascript:;">交通银行</a> </div> </div> </div> </div> </template>
支付功能实现 1. 支付携带参数 1 2 3 4 5 const baseURL = 'http://pcapi-xiaotuxian-front-devtest.itheima.net/' const backURL = 'http://127.0.0.1:5173/paycallback' const redirectUrl = encodeURIComponent (backURL)const payUrl = `${baseURL} pay/aliPay?orderId=${route.query.id} &redirect=${redirectUrl} `
2. 支付宝沙箱账号信息
支付结果页展示 1. 准备模版 1 2 3 4 5 6 7 8 9 10 11 12 13 14 15 16 17 18 19 20 21 22 23 24 25 26 27 28 29 30 31 32 33 34 35 36 37 38 39 40 41 42 43 44 45 46 47 48 49 50 51 52 53 54 55 56 57 58 59 60 61 62 63 64 65 66 67 68 69 70 71 72 <script setup> </script> <template> <div class="xtx-pay-page"> <div class="container"> <!-- 支付结果 --> <div class="pay-result"> <span class="iconfont icon-queren2 green"></span> <span class="iconfont icon-shanchu red"></span> <p class="tit">支付成功</p> <p class="tip">我们将尽快为您发货,收货期间请保持手机畅通</p> <p>支付方式:<span>支付宝</span></p> <p>支付金额:<span>¥200.00</span></p> <div class="btn"> <el-button type="primary" style="margin-right:20px">查看订单</el-button> <el-button>进入首页</el-button> </div> <p class="alert"> <span class="iconfont icon-tip"></span> 温馨提示:小兔鲜儿不会以订单异常、系统升级为由要求您点击任何网址链接进行退款操作,保护资产、谨慎操作。 </p> </div> </div> </div> </template> <style scoped lang="scss"> .pay-result { padding: 100px 0; background: #fff; text-align: center; margin-top: 20px; >.iconfont { font-size: 100px; } .green { color: #1dc779; } .red { color: $priceColor; } .tit { font-size: 24px; } .tip { color: #999; } p { line-height: 40px; font-size: 16px; } .btn { margin-top: 50px; } .alert { font-size: 12px; color: #999; margin-top: 50px; } } </style>
2. 绑定路由 1 2 3 4 { path : 'paycallback' , component : PayBack },
3. 渲染数据 1 2 3 4 5 6 7 8 9 10 11 12 13 14 15 16 17 18 19 20 21 22 23 24 25 26 27 28 29 30 31 32 33 34 35 36 37 38 39 40 41 <script setup> import { getOrderAPI } from '@/apis/pay' import { onMounted, ref } from 'vue' import { useRoute } from 'vue-router' const route = useRoute() const orderInfo = ref({}) const getOrderInfo = async () => { const res = await getOrderAPI(route.query.orderId) orderInfo.value = res.result } onMounted(() => getOrderInfo()) </script> <template> <div class="xtx-pay-page"> <div class="container"> <!-- 支付结果 --> <div class="pay-result"> <!-- 路由参数获取到的是字符串而不是布尔值 --> <span class="iconfont icon-queren2 green" v-if="$route.query.payResult === 'true'"></span> <span class="iconfont icon-shanchu red" v-else></span> <p class="tit">支付{{ $route.query.payResult === 'true' ? '成功' : '失败' }}</p> <p class="tip">我们将尽快为您发货,收货期间请保持手机畅通</p> <p>支付方式:<span>支付宝</span></p> <p>支付金额:<span>¥{{ orderInfo.payMoney?.toFixed(2) }}</span></p> <div class="btn"> <el-button type="primary" style="margin-right:20px">查看订单</el-button> <el-button>进入首页</el-button> </div> <p class="alert"> <span class="iconfont icon-tip"></span> 温馨提示:小兔鲜儿不会以订单异常、系统升级为由要求您点击任何网址链接进行退款操作,保护资产、谨慎操作。 </p> </div> </div> </div> </template>
倒计时逻辑函数封装 1 2 3 4 5 6 7 8 9 10 11 12 13 14 15 16 17 18 19 20 21 22 23 24 25 26 27 import { computed, onUnmounted, ref } from 'vue' import dayjs from 'dayjs' export const useCountDown = ( let timer = null const time = ref (0 ) const formatTime = computed (() => dayjs.unix (time.value ).format ('mm分ss秒' )) const start = (currentTime ) => { time.value = currentTime timer = setInterval (() => { time.value -- }, 1000 ) } onUnmounted (() => { timer && clearInterval (timer) }) return { formatTime, start } }
路由配置 1. 准备路由模版 1 2 3 4 5 6 7 8 9 10 11 12 13 14 15 16 17 18 19 20 21 22 23 24 25 26 27 28 29 30 31 32 33 34 35 36 37 38 39 40 41 42 43 44 45 46 47 48 49 50 51 52 53 54 55 56 57 58 59 60 61 62 63 64 65 66 67 68 69 70 71 72 73 74 75 76 77 78 79 80 81 82 83 84 85 86 87 88 89 90 <script setup> </script> <template> <div class="container"> <div class="xtx-member-aside"> <div class="user-manage"> <h4>我的账户</h4> <div class="links"> <RouterLink to="/member/user">个人中心</RouterLink> </div> <h4>交易管理</h4> <div class="links"> <RouterLink to="/member/order">我的订单</RouterLink> </div> </div> </div> <div class="article"> <!-- 三级路由的挂载点 --> <!-- <RouterView /> --> </div> </div> </template> <style scoped lang="scss"> .container { display: flex; padding-top: 20px; .xtx-member-aside { width: 220px; margin-right: 20px; border-radius: 2px; background-color: #fff; .user-manage { background-color: #fff; h4 { font-size: 18px; font-weight: 400; padding: 20px 52px 5px; border-top: 1px solid #f6f6f6; } .links { padding: 0 52px 10px; } a { display: block; line-height: 1; padding: 15px 0; font-size: 14px; color: #666; position: relative; &:hover { color: $xtxColor; } &.active, &.router-link-exact-active { color: $xtxColor; &:before { display: block; } } &:before { content: ''; display: none; width: 6px; height: 6px; border-radius: 50%; position: absolute; top: 19px; left: -16px; background-color: $xtxColor; } } } } .article { width: 1000px; background-color: #fff; } } </style>
2. 配置路由 1 2 3 4 5 6 7 import Member from '@/views/Member/index.vue' { path : '/member' , component : Member , }
3. 准备个人信息和我的订单路由组件 1 2 3 4 5 6 7 8 9 10 11 12 13 14 15 16 17 18 19 20 21 22 23 24 25 26 27 28 29 30 31 32 33 34 35 36 37 38 39 40 41 42 43 44 45 46 47 48 49 50 51 52 53 54 55 56 57 58 59 60 61 62 63 64 65 66 67 68 69 70 71 72 73 74 75 76 77 78 79 80 81 82 83 84 85 86 87 88 89 90 91 92 93 94 95 96 97 98 99 100 101 102 103 104 105 106 107 108 109 110 111 112 113 114 115 116 117 118 119 120 121 122 123 124 125 126 127 128 129 130 131 <script setup> const userStore = {} </script> <template> <div class="home-overview"> <!-- 用户信息 --> <div class="user-meta"> <div class="avatar"> <img :src="userStore.userInfo?.avatar" /> </div> <h4>{{ userStore.userInfo?.account }}</h4> </div> <div class="item"> <a href="javascript:;"> <span class="iconfont icon-hy"></span> <p>会员中心</p> </a> <a href="javascript:;"> <span class="iconfont icon-aq"></span> <p>安全设置</p> </a> <a href="javascript:;"> <span class="iconfont icon-dw"></span> <p>地址管理</p> </a> </div> </div> <div class="like-container"> <div class="home-panel"> <div class="header"> <h4 data-v-bcb266e0="">猜你喜欢</h4> </div> <div class="goods-list"> <!-- <GoodsItem v-for="good in likeList" :key="good.id" :good="good" /> --> </div> </div> </div> </template> <style scoped lang="scss"> .home-overview { height: 132px; background: url(@/assets/images/center-bg.png) no-repeat center / cover; display: flex; .user-meta { flex: 1; display: flex; align-items: center; .avatar { width: 85px; height: 85px; border-radius: 50%; overflow: hidden; margin-left: 60px; img { width: 100%; height: 100%; } } h4 { padding-left: 26px; font-size: 18px; font-weight: normal; color: white; } } .item { flex: 1; display: flex; align-items: center; justify-content: space-around; &:first-child { border-right: 1px solid #f4f4f4; } a { color: white; font-size: 16px; text-align: center; .iconfont { font-size: 32px; } p { line-height: 32px; } } } } .like-container { margin-top: 20px; border-radius: 4px; background-color: #fff; } .home-panel { background-color: #fff; padding: 0 20px; margin-top: 20px; height: 400px; .header { height: 66px; border-bottom: 1px solid #f5f5f5; padding: 18px 0; display: flex; justify-content: space-between; align-items: baseline; h4 { font-size: 22px; font-weight: 400; } } .goods-list { display: flex; justify-content: space-around; } } </style>
1 2 3 4 5 6 7 8 9 10 11 12 13 14 15 16 17 18 19 20 21 22 23 24 25 26 27 28 29 30 31 32 33 34 35 36 37 38 39 40 41 42 43 44 45 46 47 48 49 50 51 52 53 54 55 56 57 58 59 60 61 62 63 64 65 66 67 68 69 70 71 72 73 74 75 76 77 78 79 80 81 82 83 84 85 86 87 88 89 90 91 92 93 94 95 96 97 98 99 100 101 102 103 104 105 106 107 108 109 110 111 112 113 114 115 116 117 118 119 120 121 122 123 124 125 126 127 128 129 130 131 132 133 134 135 136 137 138 139 140 141 142 143 144 145 146 147 148 149 150 151 152 153 154 155 156 157 158 159 160 161 162 163 164 165 166 167 168 169 170 171 172 173 174 175 176 177 178 179 180 181 182 183 184 185 186 187 188 189 190 191 192 193 194 195 196 197 198 199 200 201 202 203 204 205 206 207 208 209 210 211 212 213 214 215 216 217 218 219 220 221 222 223 224 225 226 227 228 229 230 231 232 233 234 235 236 237 238 239 240 241 242 243 244 245 246 247 248 249 250 251 252 253 254 255 256 257 258 259 260 261 262 263 264 265 266 267 <script setup> // tab列表 const tabTypes = [ { name: "all", label: "全部订单" }, { name: "unpay", label: "待付款" }, { name: "deliver", label: "待发货" }, { name: "receive", label: "待收货" }, { name: "comment", label: "待评价" }, { name: "complete", label: "已完成" }, { name: "cancel", label: "已取消" } ] // 订单列表 const orderList = [] </script> <template> <div class="order-container"> <el-tabs> <!-- tab切换 --> <el-tab-pane v-for="item in tabTypes" :key="item.name" :label="item.label" /> <div class="main-container"> <div class="holder-container" v-if="orderList.length === 0"> <el-empty description="暂无订单数据" /> </div> <div v-else> <!-- 订单列表 --> <div class="order-item" v-for="order in orderList" :key="order.id"> <div class="head"> <span>下单时间:{{ order.createTime }}</span> <span>订单编号:{{ order.id }}</span> <!-- 未付款,倒计时时间还有 --> <span class="down-time" v-if="order.orderState === 1"> <i class="iconfont icon-down-time"></i> <b>付款截止: {{order.countdown}}</b> </span> </div> <div class="body"> <div class="column goods"> <ul> <li v-for="item in order.skus" :key="item.id"> <a class="image" href="javascript:;"> <img :src="item.image" alt="" /> </a> <div class="info"> <p class="name ellipsis-2"> {{ item.name }} </p> <p class="attr ellipsis"> <span>{{ item.attrsText }}</span> </p> </div> <div class="price">¥{{ item.realPay?.toFixed(2) }}</div> <div class="count">x{{ item.quantity }}</div> </li> </ul> </div> <div class="column state"> <p>{{ order.orderState }}</p> <p v-if="order.orderState === 3"> <a href="javascript:;" class="green">查看物流</a> </p> <p v-if="order.orderState === 4"> <a href="javascript:;" class="green">评价商品</a> </p> <p v-if="order.orderState === 5"> <a href="javascript:;" class="green">查看评价</a> </p> </div> <div class="column amount"> <p class="red">¥{{ order.payMoney?.toFixed(2) }}</p> <p>(含运费:¥{{ order.postFee?.toFixed(2) }})</p> <p>在线支付</p> </div> <div class="column action"> <el-button v-if="order.orderState === 1" type="primary" size="small"> 立即付款 </el-button> <el-button v-if="order.orderState === 3" type="primary" size="small"> 确认收货 </el-button> <p><a href="javascript:;">查看详情</a></p> <p v-if="[2, 3, 4, 5].includes(order.orderState)"> <a href="javascript:;">再次购买</a> </p> <p v-if="[4, 5].includes(order.orderState)"> <a href="javascript:;">申请售后</a> </p> <p v-if="order.orderState === 1"><a href="javascript:;">取消订单</a></p> </div> </div> </div> <!-- 分页 --> <div class="pagination-container"> <el-pagination background layout="prev, pager, next" /> </div> </div> </div> </el-tabs> </div> </template> <style scoped lang="scss"> .order-container { padding: 10px 20px; .pagination-container { display: flex; justify-content: center; } .main-container { min-height: 500px; .holder-container { min-height: 500px; display: flex; justify-content: center; align-items: center; } } } .order-item { margin-bottom: 20px; border: 1px solid #f5f5f5; .head { height: 50px; line-height: 50px; background: #f5f5f5; padding: 0 20px; overflow: hidden; span { margin-right: 20px; &.down-time { margin-right: 0; float: right; i { vertical-align: middle; margin-right: 3px; } b { vertical-align: middle; font-weight: normal; } } } .del { margin-right: 0; float: right; color: #999; } } .body { display: flex; align-items: stretch; .column { border-left: 1px solid #f5f5f5; text-align: center; padding: 20px; >p { padding-top: 10px; } &:first-child { border-left: none; } &.goods { flex: 1; padding: 0; align-self: center; ul { li { border-bottom: 1px solid #f5f5f5; padding: 10px; display: flex; &:last-child { border-bottom: none; } .image { width: 70px; height: 70px; border: 1px solid #f5f5f5; } .info { width: 220px; text-align: left; padding: 0 10px; p { margin-bottom: 5px; &.name { height: 38px; } &.attr { color: #999; font-size: 12px; span { margin-right: 5px; } } } } .price { width: 100px; } .count { width: 80px; } } } } &.state { width: 120px; .green { color: $xtxColor; } } &.amount { width: 200px; .red { color: $priceColor; } } &.action { width: 140px; a { display: block; &:hover { color: $xtxColor; } } } } } } </style>
4. 配置三级路由 1 2 3 4 5 6 7 8 9 10 11 12 13 14 15 16 17 18 import MemberInfo from '@/views/Member/components/UserInfo.vue' import MemberOrder from '@/views/Member/components/UserOrder.vue' { path : '/member' , component : Member , children : [ { path : '' , component : MemberInfo }, { path : 'order' , component : MemberOrder } ] }
个人中心信息渲染 1. 使用Pinia数据渲染个人信息 1 2 3 4 5 6 7 8 9 10 11 12 13 14 15 <script setup> // 导入userStore import { useUserStore } from '@/stores/userStore' const userStore = useUserStore() </script> <template> <!-- 用户信息 --> <div class="user-meta"> <div class="avatar"> <img :src="userStore.userInfo?.avatar" /> </div> <h4>{{ userStore.userInfo?.account }}</h4> </div> </template>
2. 封装猜你喜欢接口 1 2 3 4 5 6 7 8 export const getLikeListAPI = ({ limit = 4 } ) => { return request ({ url :'/goods/relevant' , params : { limit } }) }
3. 渲染猜你喜欢数据 1 2 3 4 5 6 7 8 9 10 11 12 13 14 15 16 17 18 19 <script setup> import { onMounted, ref } from 'vue' // 导入GoodsItem组件 import GoodsItem from '@/views/Home/components/GoodsItem.vue' // 获取猜你喜欢列表 const likeList = ref([]) const getLikeList = async () => { const res = await getLikeListAPI({ limit: 4 }) likeList.value = res.result } onMounted(() => getLikeList()) </script> <template> <div class="goods-list"> <GoodsItem v-for="good in likeList" :key="good.id" :goods="good" /> </div> </template>
我的订单 1. 基础列表渲染 1 2 3 4 5 6 7 8 9 10 11 12 13 14 15 16 export const getUserOrder = (params ) => { return request ({ url :'/member/order' , method :'GET' , params }) }
1 2 3 4 5 6 7 8 9 10 11 12 13 14 15 16 17 18 <script setup> import { getUserOrder } from '@/apis/order' import { onMounted, ref } from 'vue' // 获取订单列表 const orderList = ref([]) const params = ref({ orderState: 0, page: 1, pageSize: 2 }) const getOrderList = async () => { const res = await getUserOrder(params.value) orderList.value = res.result.items total.value = res.result.counts } onMounted(() => getOrderList()) </script>
2. tab切换实现 1 2 3 4 5 6 7 8 9 10 11 12 13 14 15 16 17 18 19 20 21 22 23 24 25 <script setup> // tab列表 const tabTypes = [ { name: "all", label: "全部订单" }, { name: "unpay", label: "待付款" }, { name: "deliver", label: "待发货" }, { name: "receive", label: "待收货" }, { name: "comment", label: "待评价" }, { name: "complete", label: "已完成" }, { name: "cancel", label: "已取消" } ] // tab切换 const tabChange = (type) => { params.value.orderState = type getOrderList() } </script> <template> <el-tabs @tab-change="tabChange"> <!-- 省略... --> </el-tabs> </template>
3. 分页逻实现
页数 = 总条数 / 每页条数
1 2 3 4 5 6 7 8 9 10 11 12 13 14 15 16 17 18 19 20 21 22 23 <script setup> // 补充总条数 const total = ref(0) const getOrderList = async () => { const res = await getUserOrder(params.value) // 存入总条数 total.value = res.result.counts } // 页数切换 const pageChange = (page) => { params.value.page = page getOrderList() } </script> <template> <el-pagination :total="total" @current-change="pageChange" :page-size="params.pageSize" background layout="prev, pager, next" /> </template>
细节优化 1. 默认三级路由设置 1 2 3 4 5 6 7 8 9 10 11 12 13 14 { path : 'member' , component : Member , children : [ { path : '' , component : UserInfo }, { path : 'order' , component : UserOrder } ] }
2. 订单状态显示适配 1 2 3 4 5 6 7 8 9 10 11 12 13 14 15 16 17 18 19 20 <script setup> // 创建格式化函数 const fomartPayState = (payState) => { const stateMap = { 1: '待付款', 2: '待发货', 3: '待收货', 4: '待评价', 5: '已完成', 6: '已取消' } return stateMap[payState] } </script> <template> <!-- 调用函数适配显示 --> <p>{{ fomartPayState(order.orderState)}}</p> </template>
Sku组件封装 1. 准备模版渲染规格数据
使用Vite快速创建一个Vue项目,在项目中添加请求插件axios,然后新增一个SKU组件,在根组件中把它渲染出来,下面是规格内容的基础模板
1 2 3 4 5 6 7 8 9 10 11 12 13 14 15 16 17 18 19 20 21 22 23 24 25 26 27 28 29 30 31 32 33 34 35 36 37 38 39 40 41 42 43 44 45 46 47 48 49 50 51 52 53 54 55 56 57 58 59 60 61 62 63 64 65 66 67 68 69 70 71 72 73 74 75 76 77 78 79 80 81 82 83 84 85 <script setup> import { onMounted, ref } from 'vue' import axios from 'axios' // 商品数据 const goods = ref({}) const getGoods = async () => { // 1135076 初始化就有无库存的规格 // 1369155859933827074 更新之后有无库存项(蓝色-20cm-中国) const res = await axios.get('http://pcapi-xiaotuxian-front-devtest.itheima.net/goods?id=1369155859933827074') goods.value = res.data.result } onMounted(() => getGoods()) </script> <template> <div class="goods-sku"> <dl v-for="item in goods.specs" :key="item.id"> <dt>{{ item.name }}</dt> <dd> <template v-for="val in item.values" :key="val.name"> <!-- 图片类型规格 --> <img v-if="val.picture" :src="val.picture" :title="val.name"> <!-- 文字类型规格 --> <span v-else>{{ val.name }}</span> </template> </dd> </dl> </div> </template> <style scoped lang="scss"> @mixin sku-state-mixin { border: 1px solid #e4e4e4; margin-right: 10px; cursor: pointer; &.selected { border-color: #27ba9b; } &.disabled { opacity: 0.6; border-style: dashed; cursor: not-allowed; } } .goods-sku { padding-left: 10px; padding-top: 20px; dl { display: flex; padding-bottom: 20px; align-items: center; dt { width: 50px; color: #999; } dd { flex: 1; color: #666; >img { width: 50px; height: 50px; margin-bottom: 4px; @include sku-state-mixin; } >span { display: inline-block; height: 30px; line-height: 28px; padding: 0 20px; margin-bottom: 4px; @include sku-state-mixin; } } } } </style>
2. 选中和取消选中实现
基本思路:
每一个规格按钮都拥有自己的选中状态数据-selected,true为选中,false为取消选中
配合动态class,把选中状态selected作为判断条件,true让active类名显示,false让active类名不显示
点击的是未选中,把同一个规格的其他取消选中,当前点击项选中;点击的是已选中,直接取消
1 2 3 4 5 6 7 8 9 10 11 12 13 14 15 16 17 18 19 20 21 22 23 24 25 26 27 28 29 30 31 32 33 34 35 <script setup> // 省略代码 // 选中和取消选中实现 const changeSku = (item, val) => { // 点击的是未选中,把同一个规格的其他取消选中,当前点击项选中,点击的是已选中,直接取消 if (val.selected) { val.selected = false } else { item.values.forEach(valItem => valItem.selected = false) val.selected = true } } </script> <template> <div class="goods-sku"> <dl v-for="item in goods.specs" :key="item.id"> <dt>{{ item.name }}</dt> <dd> <template v-for="val in item.values" :key="val.name"> <img v-if="val.picture" @click="changeSku(item, val)" :class="{ selected: val.selected }" :src="val.picture" :title="val.name"> <span v-else @click="changeSku(val)" :class="{ selected: val.selected }">{{ val.name }}</span> </template> </dd> </dl> </div> </template>
3. 规格禁用功能实现 整体思路分析
生成路径字典 幂集算法
1 2 3 4 5 6 7 8 9 10 11 12 13 14 15 16 17 18 19 20 21 22 23 24 25 26 27 28 export default function bwPowerSet (originalSet ) { const subSets = [] const numberOfCombinations = 2 ** originalSet.length for (let combinationIndex = 0 ; combinationIndex < numberOfCombinations; combinationIndex += 1 ) { const subSet = [] for (let setElementIndex = 0 ; setElementIndex < originalSet.length ; setElementIndex += 1 ) { if (combinationIndex & (1 << setElementIndex)) { subSet.push (originalSet[setElementIndex]) } } subSets.push (subSet) } return subSets }
1 2 3 4 5 6 7 8 9 10 11 12 13 14 15 16 17 18 19 20 21 22 23 24 25 26 27 28 29 30 31 32 33 34 35 36 37 38 const getPathMap = (goods ) => { const pathMap = {} const effectiveSkus = goods.skus .filter (sku =>inventory > 0 ) effectiveSkus.forEach (sku => const selectedValArr = sku.specs .map (val =>valueName ) const valueArrPowerSet = powerSet (selectedValArr) valueArrPowerSet.forEach (arr => const key = arr.join ('-' ) if (pathMap[key]) { pathMap[key].push (sku.id ) } else { pathMap[key] = [sku.id ] } }) }) return pathMap } let pathMap = {}const getGoods = async ( const res = await axios.get ('http://pcapi-xiaotuxian-front-devtest.itheima.net/goods?id=1135076' ) goods.value = res.data .result pathMap = getPathMap (goods.value ) initDisabledState (goods.value .specs , pathMap) }
根据路径字典设置初始化状态
思路:判断规格的name属性是否能在有效路径字典中找到,如果找不到就禁用
1 2 3 4 5 6 7 8 9 10 11 12 13 14 15 16 17 18 19 20 21 22 23 24 25 26 27 const initDisabledState = (specs, pathMap ) => { specs.forEach (item => item.values .forEach (val => val.disabled = !pathMap[val.name ] }) }) } let patchMap = {}const getGoods = async ( const res = await axios.get ('http://pcapi-xiaotuxian-front-devtest.itheima.net/goods?id=1135076' ) goods.value = res.data .result pathMap = getPathMap (goods.value ) initDisabledState (goods.value .specs , pathMap) } <img :class ="{ selected: val.selected, disabled: val.disabled }" /> <span :class ="{ selected: val.selected, disabled: val.disabled }" > {{val.name }}</span >
根据路径字典设置组合状态
思路:
根据当前选中规格,生成顺序规格数组 => [‘黑色’, undefined, undefined ]
遍历每一个规格按钮
如何规格按钮已经选中,忽略判断
1 2 3 4 5 6 7 8 9 10 11 12 13 14 15 16 17 18 19 20 21 22 23 24 const getSelectedValues = (specs ) => { const arr = [] specs.forEach (spec => const selectedVal = spec.values .find (value =>selected ) arr.push (selectedVal ? selectedVal.name : undefined ) }) return arr } const updateDisabledState = (specs, pathMap ) => { specs.forEach ((item, i ) => { const selectedValues = getSelectedValues (specs) item.values .forEach (val => if (val.selected ) return const _seletedValues = [...selectedValues] _seletedValues[i] = val.name const key = _seletedValues.filter (value =>join ('*' ) val.disabled = !pathMap[key] }) }) }
4. 产出Prop数据 1 2 3 4 5 6 7 8 9 10 11 12 13 14 15 16 17 const changeSku = (item, val ) => { const index = getSelectedValues (goods.value .specs ).findIndex (item =>undefined ) if (index > -1 ) { console .log ('找到了,信息不完整' ) } else { console .log ('没有找到,信息完整,可以产出' ) const key = getSelectedValues (goods.value .specs ).join ('*' ) const skuIds = pathMap[key] console .log (skuIds) const skuObj = goods.value .skus .find (item =>id === skuIds[0 ]) console .log ('sku对象为' , skuObj) } }